
실무 프로젝트로 배우는 빅데이터 기술 을 읽고 좀 더 실무 환경에 가깝게 실습해 볼 수 있는 방법에 대해 적어 보았습니다.
빅데이터 기술에 관심이 있다면 실무 프로젝트로 배우는 빅데이터 기술 을 읽어보시길 꼭 추천 드립니다 ^^
01. Google Cloud Platform으로 작업 환경 구성
-
node 로 사용할 VM 생성하기
-
Cloudera Manager 설치
-
Local PC에서 각 노드에 접속하기 위한 host 파일 설정 (Mac OS 기준)
# 각 노드(VM) IP 설정
$> sudo vi /private/etc/hosts
...
35.xxx.xxx.59	  node1
35.xxx.xxx.44	  node2
34.xxx.xxx.242	node3
34.xxx.xxx.76	  node4
34.xxx.xxx.102	node5

$> dscacheutil -flushcache
02. 빅데이터 파일럿 프로젝트
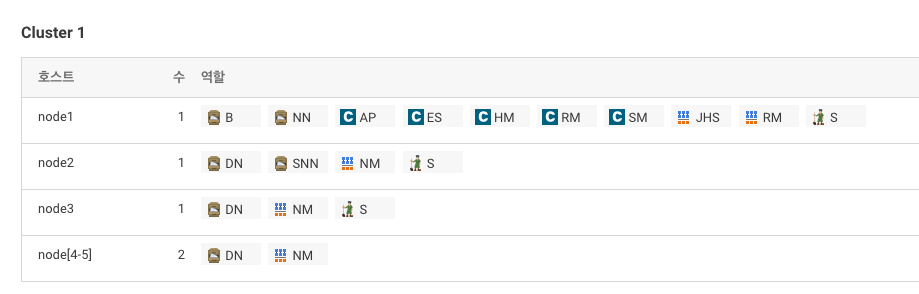
빅데이터 기본 소프트웨어 설치
-
HDFS, YARN(MR2 Included), 주키퍼 설치
-
데이터베이스 설정 - Report Manager
Database 호스트 이름 데이터베이스 유형 데이터베이스 이름 사용자 이름 암호 node1 MySQL rman rman rman
실습 자료 다운로드
-
node2서버에root로 ssh 접속 -
실습자료는
/git/bigdata에 저장 -
작업폴더는
/home/pilot-pjt를 사용할 예정$> yum install -y git $> mkdir git && cd git $> git clone https://github.com/wikibook/bigdata
Hdfs 명령어 실습
-
node2서버에root로 ssh 접속 -
Sample.txt 파일 준비
$> cd $> mkdir -p /home/bigdata $> cp /root/git/bigdata/CH02/Sample.txt /home/bigdata/. -
Skip해도 됨
$> hdfs dfs -put /home/bigdata/Sample.txt /tmp
$> hdfs dfs -ls /tmp
$> hdfs dfs -cat /tmp/Sample.txt

$> hdfs dfs -stat '%b %o %r %u %n' /tmp/Sample.txt
$> hdfs dfs -mv /tmp/Sample.txt /tmp/Sample2.txt
$> hdfs fsck
$> hdfs dfsadmin -report

$> hdfs dfs -get /tmp/Sample2.txt
$> sudo -u hdfs hdfs dfs -rm /tmp/Sample2.txt
주키퍼 설치 확인 (안해도 됨)
-
node2서버에root로 ssh 접속 -
Skip해도 됨
$> zookeeper-client

# create [노드 경로(디렉토리)] [노드명]
[zk: localhost:2181(CONNECTED) 0] create /pilot-pjt bigdata
[zk: localhost:2181(CONNECTED) 1] ls /
[zk: localhost:2181(CONNECTED) 2] get /pilot-pjt
[zk: localhost:2181(CONNECTED) 3] delete /pilot-pjt
[zk: localhost:2181(CONNECTED) 4] quit
로그 시뮬레이터 설치
-
node2서버에root로 ssh 접속 -
사전 준비사항
$> cd $> mkdir -p /home/pilot-pjt/working/car-batch-log $> mkdir /home/pilot-pjt/working/driver-realtime-log $> chmod 777 -R /home/pilot-pjt $> rm /usr/bin/java rm: cannot remove '/usr/bin/java': 그런 파일이나 디렉터리가 없습니다 $> rm /usr/bin/javac rm: cannot remove '/usr/bin/javac': 그런 파일이나 디렉터리가 없습니다 $> ln -s /usr/java/jdk1.7.0_67-cloudera/bin/java /usr/bin/java $> ln -s /usr/java/jdk1.7.0_67-cloudera/bin/javac /usr/bin/javac $> java -version java version "1.7.0_67" Java(TM) SE Runtime Environment (build 1.7.0_67-b01) Java HotSpot(TM) 64-Bit Server VM (build 24.65-b04, mixed mode) $> cp /root/git/bigdata/CH02/bigdata.smartcar.loggen-1.0.jar /home/pilot-pjt/working/ -
첫번째 로그 시뮬레이터 (운행 정보)
$> cd /home/pilot-pjt/working/ $> java -cp bigdata.smartcar.loggen-1.0.jar com.wikibook.bigdata.smartcar.loggen.DriverLogMain 20190101 10 -
로그 확인 (터미널 하나 더 띄워서
node2서버에root로 ssh 접속)$> tail -f /home/pilot-pjt//working/driver-realtime-log/SmartCarDriverInfo.log -
두번째 로그 시뮬레이터 (스마트카 정보)
$> java -cp bigdata.smartcar.loggen-1.0.jar com.wikibook.bigdata.smartcar.loggen.CarLogMain 20190101 10 -
로그 확인 (터미널을 하나 더 띄워서
node2서버에root로 ssh 접속)$> tail -f /home/pilot-pjt//working/SmartCar/SmartCarStatusInfo_20190101.txt -
프로세스 종료는
Ctrl + C
로그시뮬레이터 실행 시 첫번째 매개변수는 실행날짜이고, 두번째 매개변수는 스마트카 대수
PC성능에 맞게 변경해도 됨
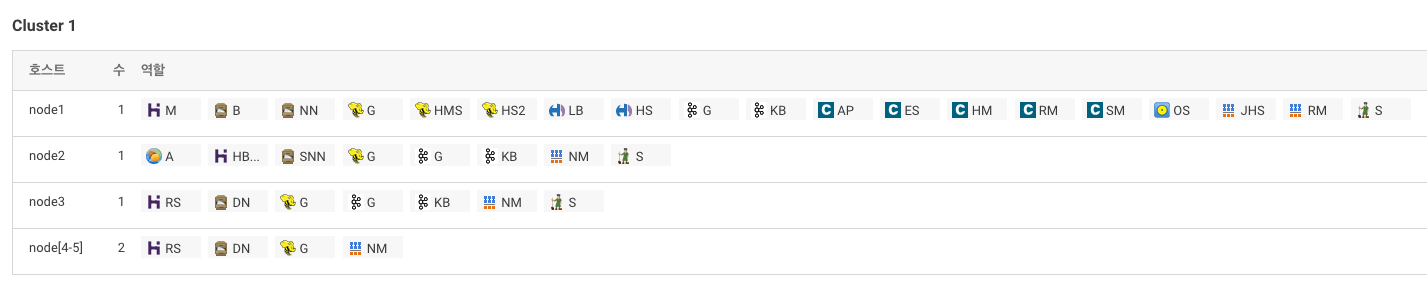
03. 빅데이터 수집
Flume Service 추가
- flume Heap Memory 설정
CM홈 > Flume > 구성- 검색창에
java heap이라고 검색 - Agent의 Java 힙 크기를 100MB로 설정 (기본 설정 : 50 MB)
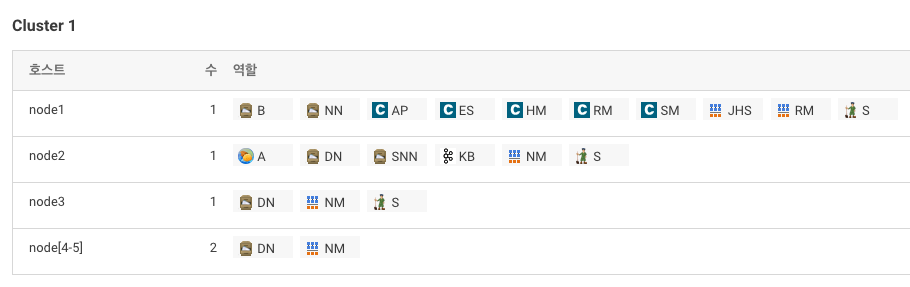
Kafka Service 추가
- Parcel 설정
CM홈 > 호스트 > Parcel- 우측 상단
구성버튼 클릭 - 원격 Parcel 리포지토리 URL 값 변경 (http://archive.cloudera.com/kafka/parcels/2.2.0/)
다운로드, 배포, 활성화버튼 클릭
- Kafka 서비스 추가 -> 실행 단계에서 에러발생
Kafka > 구성에서Java Heap Size of Broker값 256MB로 설정- 서비스 추가 Resume
🙉 kafka 재시작해도 잘 안될 경우 로그 확인 필요아래 에러는
rm /var/local/kafka/data/meta.properties를 통해 해결$> tail /var/log/kafka/kafka-broker-node2.log ... 2019-06-07 14:42:51,360 FATAL kafka.server.KafkaServerStartable: Fatal error during KafkaServerStartable startup. Prepare to shutdown kafka.common.InconsistentBrokerIdException: Configured broker.id 62 doesn't match stored broker.id 50 in meta.properties. If you moved your data, make sure your configured broker.id matches. If you intend to create a new broker, you should remove all data in your data directories (log.dirs).
역할 구성
Flume 설정
-
Flume > 인스턴스 > List에서 Agent Click > 구성
(Config파일 뿐만 아니라 Agent 이름을 반드시 설정한 후 재시작 !!)Source Interceptor Channel Sink SmartCarInfo_SpoolSource filterInterceptor SmartCarInfo_Channel SmartCarInfo_LoggerSink DriverCarInfo_TailSource filterInterceptor2 DriverCarInfo_Channel DriverCarInfo_KafkaSink SmartCar_Agent.sources = SmartCarInfo_SpoolSource DriverCarInfo_TailSource SmartCar_Agent.channels = SmartCarInfo_Channel DriverCarInfo_Channel SmartCar_Agent.sinks = SmartCarInfo_LoggerSink DriverCarInfo_KafkaSink SmartCar_Agent.sources.SmartCarInfo_SpoolSource.type = spooldir SmartCar_Agent.sources.SmartCarInfo_SpoolSource.spoolDir = /home/pilot-pjt/working/car-batch-log SmartCar_Agent.sources.SmartCarInfo_SpoolSource.deletePolicy = immediate SmartCar_Agent.sources.SmartCarInfo_SpoolSource.batchSize = 1000 SmartCar_Agent.sources.SmartCarInfo_SpoolSource.interceptors = filterInterceptor SmartCar_Agent.sources.SmartCarInfo_SpoolSource.interceptors.filterInterceptor.type = regex_filter SmartCar_Agent.sources.SmartCarInfo_SpoolSource.interceptors.filterInterceptor.regex = ^\\d{14} SmartCar_Agent.sources.SmartCarInfo_SpoolSource.interceptors.filterInterceptor.excludeEvents = false SmartCar_Agent.channels.SmartCarInfo_Channel.type = memory SmartCar_Agent.channels.SmartCarInfo_Channel.capacity = 100000 SmartCar_Agent.channels.SmartCarInfo_Channel.transactionCapacity = 10000 SmartCar_Agent.sinks.SmartCarInfo_LoggerSink.type = logger SmartCar_Agent.sources.SmartCarInfo_SpoolSource.channels = SmartCarInfo_Channel SmartCar_Agent.sinks.SmartCarInfo_LoggerSink.channel = SmartCarInfo_Channel SmartCar_Agent.sources.DriverCarInfo_TailSource.type = exec SmartCar_Agent.sources.DriverCarInfo_TailSource.command = tail -F /home/pilot-pjt/working/driver-realtime-log/SmartCarDriverInfo.log SmartCar_Agent.sources.DriverCarInfo_TailSource.restart = true SmartCar_Agent.sources.DriverCarInfo_TailSource.batchSize = 1000 SmartCar_Agent.sources.DriverCarInfo_TailSource.interceptors = filterInterceptor2 SmartCar_Agent.sources.DriverCarInfo_TailSource.interceptors.filterInterceptor2.type = regex_filter SmartCar_Agent.sources.DriverCarInfo_TailSource.interceptors.filterInterceptor2.regex = ^\\d{14} SmartCar_Agent.sources.DriverCarInfo_TailSource.interceptors.filterInterceptor2.excludeEvents = false SmartCar_Agent.sinks.DriverCarInfo_KafkaSink.type = org.apache.flume.sink.kafka.KafkaSink SmartCar_Agent.sinks.DriverCarInfo_KafkaSink.topic = SmartCar-Topic SmartCar_Agent.sinks.DriverCarInfo_KafkaSink.brokerList = node1:9092 node2:9092 node3:9092 SmartCar_Agent.sinks.DriverCarInfo_KafkaSink.requiredAcks = 1 SmartCar_Agent.sinks.DriverCarInfo_KafkaSink.batchSize = 1000 SmartCar_Agent.channels.DriverCarInfo_Channel.type = memory SmartCar_Agent.channels.DriverCarInfo_Channel.capacity= 100000 SmartCar_Agent.channels.DriverCarInfo_Channel.transactionCapacity = 10000 SmartCar_Agent.sources.DriverCarInfo_TailSource.channels = DriverCarInfo_Channel SmartCar_Agent.sinks.DriverCarInfo_KafkaSink.channel = DriverCarInfo_Channel
Kafka 테스트
-
토픽 생성
kafka-topics --create --zookeeper node1:2181 node2:2181 node3:2181 --replication-factor 3 --partitions 1 --topic SmartCar-Topic -
토픽 확인
kafka-topics --list --zookeeper node1:2181 node2:2181 node3:2181 kafka-topics --describe --zookeeper node1:2181 node2:2181 node3:2181 --topic SmartCar-Topic -
토픽 삭제
kafka-topics --delete --zookeeper node1:2181 node2:2181 node3:2181 --topic SmartCar-Topic -
Producer
kafka-console-producer --broker-list node1:9092 node2:9092 node3:9092 -topic SmartCar-Topic -
Consumer
kafka-console-consumer --zookeeper node1:2181 node2:2181 node3:2181 --topic SmartCar-Topic --from-beginning
kafka-console-consumer --bootstrap-server node1:9092 node2:9092 node3:9092 --topic SmartCar-Topic --from-beginning
🙉 Topic 안지워질 때 (계속
SmartCar-Topic - marked for deletion이라고 나오고 정작 지워지지는 않음)$> zookeeper-client [zk: localhost:2181(CONNECTED) 0] ls /brokers/topics [SmartCar-Topic, SmartCar-Topic1, __consumer_offsets] [zk: localhost:2181(CONNECTED) 1] rmr /brokers/topics/SmartCar-Topic
수집기능 테스트
-
로그 시뮬레이터 실행
$> cd /home/pilot-pjt/working/ # 주행 정보 (SmartCarDriverInfo.log 생성) $> java -cp bigdata.smartcar.loggen-1.0.jar com.wikibook.bigdata.smartcar.loggen.DriverLogMain 20190101 10 # 스마트카 정보 $> java -cp bigdata.smartcar.loggen-1.0.jar com.wikibook.bigdata.smartcar.loggen.CarLogMain 20190101 10 -
파일 밀어넣기
$> mv /home/pilot-pjt/working/SmartCar/SmartCarStatusInfo_20190101.txt /home/pilot-pjt/working/car-batch-log/ -
Flume 출력 로그 확인
tail -f /var/log/flume-ng/flume-cmf-flume-AGENT-node2.log -
Kafka Consumer 작동
kafka-console-consumer --zookeeper node1:2181 node2:2181 node3:2181 --topic SmartCar-Topic
04 빅데이터 적재 1
Flume Agent 수정
-
HDFS에 적재하는 Sink 구조로 변경
Source Interceptor Channel Sink SmartCarInfo_SpoolSource timeInterceptor typeInterceptor collectDayInterceptor filterInterceptor SmartCarInfo_Channel SmartCarInfo_HdfsSink DriverCarInfo_TailSource filterInterceptor2 DriverCarInfo_Channel DriverCarInfo_KafkaSink SmartCar_Agent.sources = SmartCarInfo_SpoolSource DriverCarInfo_TailSource SmartCar_Agent.channels = SmartCarInfo_Channel DriverCarInfo_Channel SmartCar_Agent.sinks = SmartCarInfo_HdfsSink DriverCarInfo_KafkaSink SmartCar_Agent.sources.SmartCarInfo_SpoolSource.type = spooldir SmartCar_Agent.sources.SmartCarInfo_SpoolSource.spoolDir = /home/pilot-pjt/working/car-batch-log SmartCar_Agent.sources.SmartCarInfo_SpoolSource.deletePolicy = immediate SmartCar_Agent.sources.SmartCarInfo_SpoolSource.batchSize = 1000 SmartCar_Agent.sources.SmartCarInfo_SpoolSource.interceptors = timeInterceptor typeInterceptor collectDayInterceptor filterInterceptor SmartCar_Agent.sources.SmartCarInfo_SpoolSource.interceptors.timeInterceptor.type = timestamp SmartCar_Agent.sources.SmartCarInfo_SpoolSource.interceptors.timeInterceptor.preserveExisting = true SmartCar_Agent.sources.SmartCarInfo_SpoolSource.interceptors.typeInterceptor.type = static SmartCar_Agent.sources.SmartCarInfo_SpoolSource.interceptors.typeInterceptor.key = logType SmartCar_Agent.sources.SmartCarInfo_SpoolSource.interceptors.typeInterceptor.value = car-batch-log SmartCar_Agent.sources.SmartCarInfo_SpoolSource.interceptors.collectDayInterceptor.type = com.wikibook.bigdata.smartcar.flume.CollectDayInterceptor$Builder SmartCar_Agent.sources.SmartCarInfo_SpoolSource.interceptors.filterInterceptor.type = regex_filter SmartCar_Agent.sources.SmartCarInfo_SpoolSource.interceptors.filterInterceptor.regex = ^\\d{14} SmartCar_Agent.sources.SmartCarInfo_SpoolSource.interceptors.filterInterceptor.excludeEvents = false SmartCar_Agent.channels.SmartCarInfo_Channel.type = memory SmartCar_Agent.channels.SmartCarInfo_Channel.capacity = 100000 SmartCar_Agent.channels.SmartCarInfo_Channel.transactionCapacity = 10000 SmartCar_Agent.sinks.SmartCarInfo_HdfsSink.type = hdfs SmartCar_Agent.sinks.SmartCarInfo_HdfsSink.hdfs.path = /pilot-pjt/collect/%{logType}/wrk_date=%Y%m%d SmartCar_Agent.sinks.SmartCarInfo_HdfsSink.hdfs.filePrefix = %{logType} SmartCar_Agent.sinks.SmartCarInfo_HdfsSink.hdfs.fileSuffix = .log SmartCar_Agent.sinks.SmartCarInfo_HdfsSink.hdfs.fileType = DataStream SmartCar_Agent.sinks.SmartCarInfo_HdfsSink.hdfs.writeFormat = Text SmartCar_Agent.sinks.SmartCarInfo_HdfsSink.hdfs.batchSize = 10000 SmartCar_Agent.sinks.SmartCarInfo_HdfsSink.hdfs.rollInterval = 0 SmartCar_Agent.sinks.SmartCarInfo_HdfsSink.hdfs.rollCount = 0 SmartCar_Agent.sinks.SmartCarInfo_HdfsSink.hdfs.idleTimeout = 100 SmartCar_Agent.sinks.SmartCarInfo_HdfsSink.hdfs.callTimeout = 600000 SmartCar_Agent.sinks.SmartCarInfo_HdfsSink.hdfs.rollSize = 67108864 SmartCar_Agent.sinks.SmartCarInfo_HdfsSink.hdfs.threadsPoolSize = 10 SmartCar_Agent.sources.SmartCarInfo_SpoolSource.channels = SmartCarInfo_Channel SmartCar_Agent.sinks.SmartCarInfo_HdfsSink.channel = SmartCarInfo_Channel SmartCar_Agent.sources.DriverCarInfo_TailSource.type = exec SmartCar_Agent.sources.DriverCarInfo_TailSource.command = tail -F /home/pilot-pjt/working/driver-realtime-log/SmartCarDriverInfo.log SmartCar_Agent.sources.DriverCarInfo_TailSource.restart = true SmartCar_Agent.sources.DriverCarInfo_TailSource.batchSize = 1000 SmartCar_Agent.sources.DriverCarInfo_TailSource.interceptors = filterInterceptor2 SmartCar_Agent.sources.DriverCarInfo_TailSource.interceptors.filterInterceptor2.type = regex_filter SmartCar_Agent.sources.DriverCarInfo_TailSource.interceptors.filterInterceptor2.regex = ^\\d{14} SmartCar_Agent.sources.DriverCarInfo_TailSource.interceptors.filterInterceptor2.excludeEvents = false SmartCar_Agent.sinks.DriverCarInfo_KafkaSink.type = org.apache.flume.sink.kafka.KafkaSink SmartCar_Agent.sinks.DriverCarInfo_KafkaSink.topic = SmartCar-Topic SmartCar_Agent.sinks.DriverCarInfo_KafkaSink.brokerList = node1:9092 node2:9092 node3:9092 SmartCar_Agent.sinks.DriverCarInfo_KafkaSink.requiredAcks = 1 SmartCar_Agent.sinks.DriverCarInfo_KafkaSink.batchSize = 1000 SmartCar_Agent.channels.DriverCarInfo_Channel.type = memory SmartCar_Agent.channels.DriverCarInfo_Channel.capacity= 100000 SmartCar_Agent.channels.DriverCarInfo_Channel.transactionCapacity = 10000 SmartCar_Agent.sources.DriverCarInfo_TailSource.channels = DriverCarInfo_Channel SmartCar_Agent.sinks.DriverCarInfo_KafkaSink.channel = DriverCarInfo_Channel -
사용자 정의 Interceptor 추가
$> cp /root/git/bigdata/CH04/bigdata.smartcar.flume-1.0.jar /opt/cloudera/parcels/CDH/lib/flume-ng/lib/.
적재기능 테스트
-
HDFS pilot-pjt 폴더 생성
$> sudo -u hdfs hdfs dfs -mkdir /pilot-pjt $> sudo -u hdfs hdfs dfs -chown flume /pilot-pjt -
로그 시뮬레이터 실행
$> cd /home/pilot-pjt/working $> java -cp bigdata.smartcar.loggen-1.0.jar com.wikibook.bigdata.smartcar.loggen.CarLogMain 20190101 100 & -
정상 작동하는지 확인 (시간이 꽤 걸림;; 파일이 다 만들어질 때까지 기다려야 함)
$> ll /home/pilot-pjt/working/SmartCar $> tail -f /home/pilot-pjt/working/SmartCar/SmartCarStatusInfo_20190101.txt -
파일 밀어넣기
$> mv /home/pilot-pjt/working/SmartCar/SmartCarStatusInfo_20190101.txt /home/pilot-pjt/working/car-batch-log/ -
flume 로그 확인
$> tail -f /var/log/flume-ng/flume-cmf-flume-AGENT-node2.log -
HDFS 확인
$> hdfs dfs -ls -R /pilot-pjt/collect/car-batch-log drwxr-xr-x - flume supergroup 0 2019-06-07 16:35 /pilot-pjt/collect/car-batch-log/wrk_date=20190607 -rw-r--r-- 3 flume supergroup 68303308 2019-06-07 16:33 /pilot-pjt/collect/car-batch-log/wrk_date=20190607/car-batch-log.1559892752340.log -rw-r--r-- 3 flume supergroup 55209183 2019-06-07 16:35 /pilot-pjt/collect/car-batch-log/wrk_date=20190607/car-batch-log.1559892752341.log $> hdfs dfs -tail /pilot-pjt/collect/car-batch-log/wrk_date=20190607/car-batch-log.1559892752341.log -
로그 시뮬레이터 종료
bash $> ps -ef | grep smartcar.log root 4362 633 3 10:36 pts/0 00:00:54 java -cp bigdata.smartcar.loggen-1.0.jar com.wikibook.bigdata.smartcar.loggen.CarLogMain 20160101 100 $> kill -9 [pid]flume spooling이 끝나면 파일을 삭제함
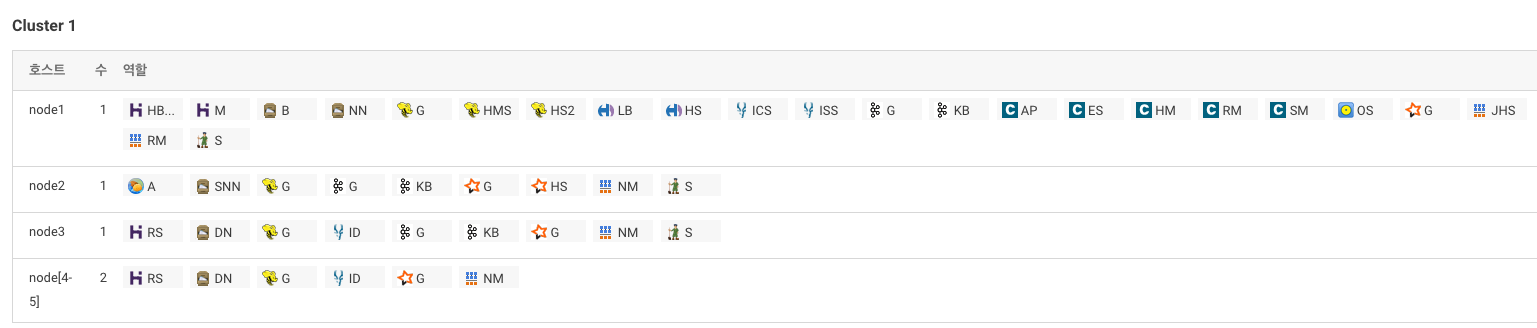
05. 빅데이터 적재 2
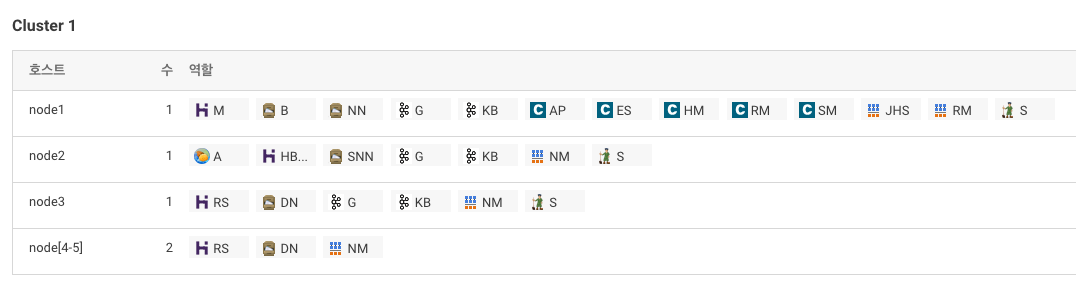
HBase 설치
-
CM에서 HBase 서비스 추가
 > stale deploy 꼭 해야 함
 -
HBase 설치 확인
-
node1에 root계정으로 접속
$> hbase shell -
테스트
hbase(main):001:0> create 'smartcar_test_table', 'cf'
hbase(main):002:0> put 'smartcar_test_table', 'row-key1', 'cf:model', 'Z0001'
hbase(main):003:0> put 'smartcar_test_table', 'row-key1', 'cf:no', '12345'
hbase(main):004:0> get 'smartcar_test_table', 'row-key1'
hbase(main):005:0> disable 'smartcar_test_table'
hbase(main):006:0> drop 'smartcar_test_table'
hbase(main):007:0> exit
Redis 설치
-
node2에 root계정으로 접속
-
기본 환경구성
yum install -y gcc* yum install -y tcl -
Redis Download & Build
$> cd /home/pilot-pjt/ $> wget http://download.redis.io/releases/redis-3.0.7.tar.gz $> tar -xvf redis-3.0.7.tar.gz $> cd /home/pilot-pjt/redis-3.0.7 $> make $> make install $> cd utils $> chmod 755 install_server.sh # install_server.sh 실행 후 엔터를 계속 치면 됨 $> ./install_server.sh $> service redis_6379 status Redis is running (29671) -
Redis 데이터 저장 및 조회하기
$> redis-cli
$> 127.0.0.1:6379> ping
PONG
$> 127.0.0.1:6379> set key:1 Hello!Bigdata
OK
$> 127.0.0.1:6379> get key:1
"Hello!Bigdata"
$> 127.0.0.1:6379> del key:1
(integer) 1
$> 127.0.0.1:6379> quit
스톰 설치
-
파일 다운로드
cd /home/pilot-pjt/ wget http://archive.apache.org/dist/storm/apache-storm-0.9.6/apache-storm-0.9.6.tar.gz tar -xvf apache-storm-0.9.6.tar.gz ln -s apache-storm-0.9.6 storm -
환경설정 파일 수정
(띄어쓰기에 매우매우 주의!!!)vi /home/pilot-pjt/storm/conf/storm.yaml ########## storm.yaml 시작 ########## storm.zookeeper.servers: - "node1" - "node2" - "node3" storm.local.dir: "/home/pilot-pjt/storm/data" nimbus.host: "node2" supervisor.slots.ports: - 6700 - 6701 - 6702 ui.port: 8087 ########## storm.yaml 끝 ########## -
로그레벨 조정
(로그레벨을 ERROR로 하면 로그가 안찍힘;;)cd /home/pilot-pjt/storm/logback vi cluster.xml ########## cluster.xml 시작 ########## <configuration scan="true" scanPeriod="60 seconds"> ... <root level="ERROR"> <appender-ref ref="A1"/> </root> <logger name="backtype.storm.security.auth.authorizer" additivity="false"> <level value="ERROR" /> <appender-ref ref="ACCESS" /> </logger> <logger name="backtype.storm.metric.LoggingMetricsConsumer" additivity="false" > <level value="ERROR"/> <appender-ref ref="METRICS"/> </logger> </configuration> ########## cluster.xml 끝 ########## -
.bash_profile에 스톰 Path 설정
vi /root/.bash_profile ########## .bash_profile 시작 ########## ... PATH=$PATH:$HOME/bin PATH=$PATH:/home/pilot-pjt/storm/bin export PATH ########## .bash_profile 끝 ########## source /root/.bash_profile echo $PATH -
java 다시 설정
(1.5 version으로 바껴있었음)rm /usr/bin/java rm /usr/bin/javac ln -s /usr/java/jdk1.7.0_67-cloudera/bin/javac /usr/bin/javac ln -s /usr/java/jdk1.7.0_67-cloudera/bin/java /usr/bin/java -
스톰 서비스 등록을 위한 스크립트 설정
cp -rf /root/git/bigdata/CH05/예제5.1/* /etc/rc.d/init.d/. chmod 755 /etc/rc.d/init.d/storm-* -
서비스 등록 스크립트 관련 Log 및 pid 디렉토리 설정
mkdir /var/log/storm mkdir /var/run/storm -
서비스 시작 및 chkconfig 등록
service storm-nimbus start service storm-supervisor start service storm-ui start chkconfig storm-nimbus on chkconfig storm-supervisor on chkconfig storm-ui on service storm-nimbus status service storm-supervisor status service storm-ui status -
storm ui 확인 (http://node2:8087/)
Storm을 활용한 실시간 적재 기능 구현
- github에서 workspace 폴더 밑에 있는
bigdata.smartcar.storm프로젝트 소스 다운로드 및 빌드 - 서버 정보와 Topic이 하드코딩 되어 있어서 일부 수정이 필요함
- eclipse 에서 프로젝트 Import 하면 에러가 나는 파일들이 있는데
@Override어노테이션 삭제했음 - 아래 기능들이 구현되어 있음
- Kafka Spout
- Split Bolt
- HBase Bolt
- 에스퍼 Bolt
- 레디스 Bolt
Redis Client 어플리케이션 구현
- github에서 workspace 폴더 밑에 있는
bigdata.smartcar.redis프로젝트 소스 다운로드 및 실행 - 서버 정보가 하드코딩 되어 있어서 일부 수정이 필요함
HBase 테이블 생성
-
RegionSplitter를 사용하여 DriverCarInfo 테이블 생성
-
column family는 "cf1"을 사용하고 3개의 Region 설정
-
Region에 접근하는 방식은 HexString
$> hbase org.apache.hadoop.hbase.util.RegionSplitter DriverCarInfo HexStringSplit -c 3 -f cf1

19/06/05 16:45:02 INFO zookeeper.ZooKeeper: Client environment:java.io.tmpdir=/tmp
19/06/05 16:45:02 INFO zookeeper.ZooKeeper: Client environment:java.compiler=<NA>
19/06/05 16:45:02 INFO zookeeper.ZooKeeper: Client environment:os.name=Linux
19/06/05 16:45:02 INFO zookeeper.ZooKeeper: Client environment:os.arch=amd64
19/06/05 16:45:02 INFO zookeeper.ZooKeeper: Client environment:os.version=2.6.32-754.14.2.el6.x86_64
19/06/05 16:45:02 INFO zookeeper.ZooKeeper: Client environment:user.name=root
19/06/05 16:45:02 INFO zookeeper.ZooKeeper: Client environment:user.home=/root
19/06/05 16:45:02 INFO zookeeper.ZooKeeper: Client environment:user.dir=/root
19/06/05 16:45:02 INFO zookeeper.ZooKeeper: Initiating client connection, connectString=node3:2181,node2:2181,node1:2181 sessionTimeout=60000 watcher=hconnection-0xa29626e0x0, quorum=node3:2181,node2:2181,node1:2181, baseZNode=/hbase
19/06/05 16:45:02 INFO zookeeper.ClientCnxn: Opening socket connection to server node1/10.146.0.58:2181. Will not attempt to authenticate using SASL (unknown error)
19/06/05 16:45:02 INFO zookeeper.ClientCnxn: Socket connection established, initiating session, client: /10.146.0.58:52026, server: node1/10.146.0.58:2181
19/06/05 16:45:02 INFO zookeeper.ClientCnxn: Session establishment complete on server node1/10.146.0.58:2181, sessionid = 0x36b26514f7400ae, negotiated timeout = 60000
19/06/05 16:45:07 INFO client.HBaseAdmin: Created DriverCarInfo
19/06/05 16:45:07 INFO client.ConnectionManager$HConnectionImplementation: Closing master protocol: MasterService
19/06/05 16:45:07 INFO client.ConnectionManager$HConnectionImplementation: Closing zookeeper sessionid=0x36b26514f7400ae
19/06/05 16:45:07 INFO zookeeper.ZooKeeper: Session: 0x36b26514f7400ae closed
19/06/05 16:45:07 INFO zookeeper.ClientCnxn: EventThread shut down
region 수를 3으로 하면 Region Server에 Request가 제대로 분배가 안됨 (10으로 늘려보니 분배가 잘되었음 ^^)
스톰 Topology 배포
-
패키징 된 jar 파일 업로드 (파일질라로 업로드 해도 좋을듯)
$> scp git/bigdata/workspace/bigdata.smartcar.storm/target/bigdata.smartcar.storm-1.0.jar root@node2:/home/pilot-pjt/working/ -
스톰 topology 배포
$> cd /home/pilot-pjt/working # bigdata.smartcar.storm-1.0.jar 에 포함된 SmartCarDriverTopology 파일을 DriverCarInfo라는 이름으로 배포 $> storm jar bigdata.smartcar.storm-1.0.jar com.wikibook.bigdata.smartcar.storm.SmartCarDriverTopology DriverCarInfo 788 [main] INFO backtype.storm.StormSubmitter - Jar not uploaded to master yet. Submitting jar... 802 [main] INFO backtype.storm.StormSubmitter - Uploading topology jar bigdata.smartcar.storm-1.0.jar to assigned location: /home/pilot-pjt/storm/data/nimbus/inbox/stormjar-2e5ab9b2-8a02-495a-a9bb-07a874e5807e.jar 1142 [main] INFO backtype.storm.StormSubmitter - Successfully uploaded topology jar to assigned location: /home/pilot-pjt/storm/data/nimbus/inbox/stormjar-2e5ab9b2-8a02-495a-a9bb-07a874e5807e.jar 1142 [main] INFO backtype.storm.StormSubmitter - Submitting topology DriverCarInfo in distributed mode with conf {"nimbus.host":"node2","HBASE_CONFIG":{"hbase.rootdir":"hdfs:\/\/node1:8020\/hbase"},"storm.zookeeper.port":2181,"topology.debug":true,"nimbus.thrift.port":6627,"storm.zookeeper.servers":["node2"]} 1571 [main] INFO backtype.storm.StormSubmitter - Finished submitting topology: DriverCarInfo -
스톰 UI 화면을 통해 확인 (http://node2:8087/)
Topology summary에 DriverCarInfo 가 활성화 되어 있음 -
스톰 Topology 제거 명령어 (필요할 때 실행)
$> storm kill [Topology 명]
실시간 적재 기능 테스트
-
로그 시뮬레이터 실행
$> java -cp /home/pilot-pjt/working/bigdata.smartcar.loggen-1.0.jar com.wikibook.bigdata.smartcar.loggen.DriverLogMain 20190101 20 & # Process 확인 $> ps -ef | grep DriverLogMain -
정상 작동하는지 확인
$> ll /home/pilot-pjt/working/driver-realtime-log $> tail -f /home/pilot-pjt/working/driver-realtime-log/SmartCarDriverInfo.log -
Kafka consumer
kafka-console-consumer --bootstrap-server node1:9092 node2:9092 node3:9092 --topic SmartCar-Topic -
HBase에 적재 데이터 확인
$> hbase shell hbase(main):001:0> count 'DriverCarInfo' hbase(main):002:0> scan 'DriverCarInfo', {LIMIT=>20} ROW COLUMN+CELL 00000010109102-B0004 column=cf1:area_number, timestamp=1559897465201, value=A01 00000010109102-B0004 column=cf1:break_pedal, timestamp=1559897465201, value=0 00000010109102-B0004 column=cf1:car_number, timestamp=1559897465201, value=B0004 00000010109102-B0004 column=cf1:date, timestamp=1559897465201, value=20190101000000 00000010109102-B0004 column=cf1:direct_light, timestamp=1559897465201, value=L 00000010109102-B0004 column=cf1:speed, timestamp=1559897465201, value=10 00000010109102-B0004 column=cf1:speed_pedal, timestamp=1559897465201, value=2 00000010109102-B0004 column=cf1:steer_angle, timestamp=1559897465201, value=L3 00000010109102-C0019 column=cf1:area_number, timestamp=1559897467778, value=A07 00000010109102-C0019 column=cf1:break_pedal, timestamp=1559897467778, value=1 00000010109102-C0019 column=cf1:car_number, timestamp=1559897467778, value=C0019 00000010109102-C0019 column=cf1:date, timestamp=1559897467778, value=20190101000000 00000010109102-C0019 column=cf1:direct_light, timestamp=1559897467778, value=N 00000010109102-C0019 column=cf1:speed, timestamp=1559897467778, value=0 00000010109102-C0019 column=cf1:speed_pedal, timestamp=1559897467778, value=0 00000010109102-C0019 column=cf1:steer_angle, timestamp=1559897467778, value=F # 첫번쨰로 조회되는 ROW Key를 조건절에 추가하여 scan hbase(main):003:0> scan 'DriverCarInfo', {STARTROW=>'00000010109102-B0004', LIMIT=>1} hbase(main):004:0> scan 'DriverCarInfo', {COLUMNS=>['cf1:car_number','cf1:area_number'],FILTER=>"RowFilter(=,'regexstring:10109102') AND SingleColumnValueFilter('cf1','area_number',=,'regexstring:A01')"} -
Redis Client 실행
scp git/bigdata/workspace/bigdata.smartcar.redis/target/bigdata.smartcar.redis-1.0.jar root@node2:/home/pilot-pjt/working/

java -cp /home/pilot-pjt/working/bigdata.smartcar.redis-1.0.jar com.wikibook.bigdata.smartcar.redis.OverSpeedCarInfo 20190103
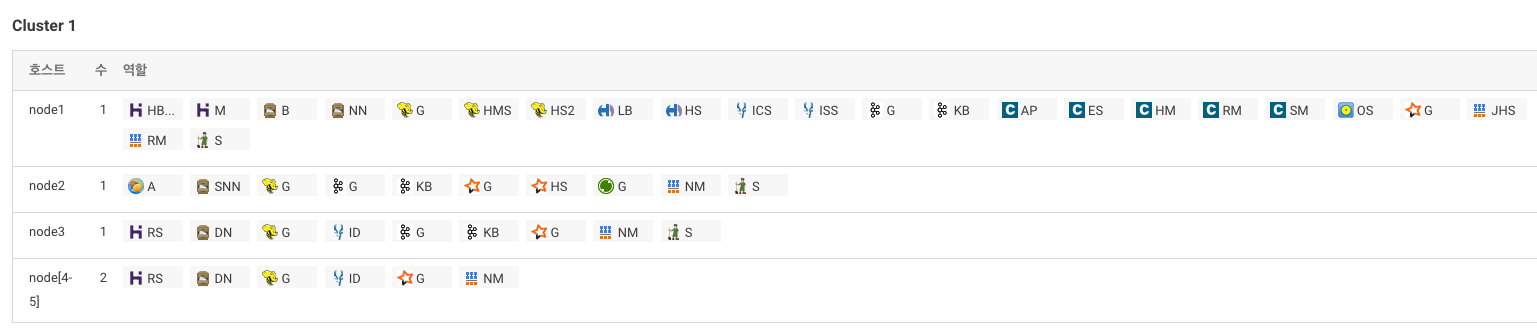
06. 빅데이터 탐색
- hive 설치
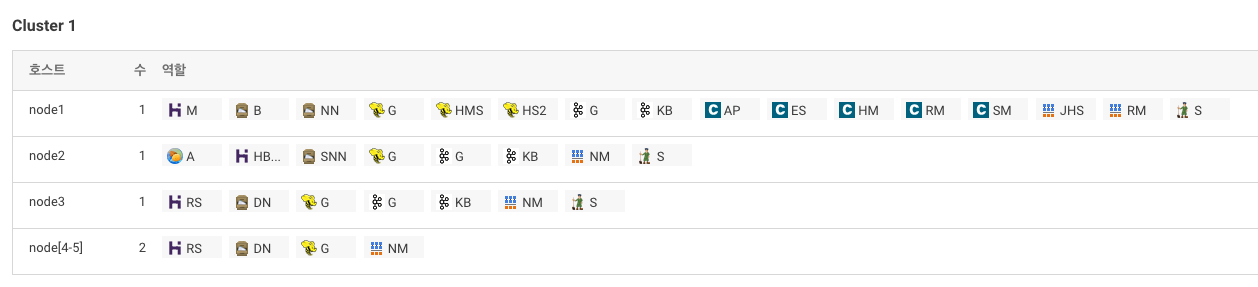
- oozie 설치
Dependency : Hbase, HDFS, Hive, YARN, ZooKeeper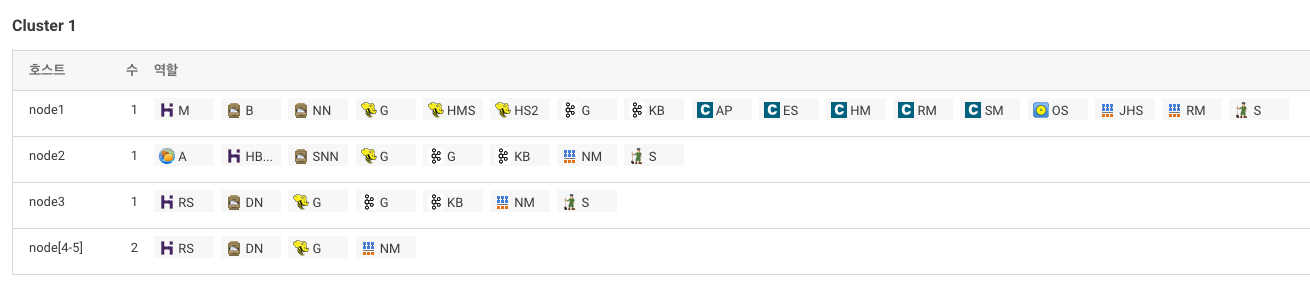
- hue 설치
- Spark 설치
Dependency : Hbase, HDFS, YARN, ZooKeeper
Stale Deploy 꼭 해야함
Hue
-
Hue 정보 확인 (http://node1:8888/about/)
-
Hbase 에러
(Failed to authenticate to HBase Thrift Server, check authentication configurations.)- HBase Thrift Server 중지
hbase.regionserver.thrift.server.type속성TNonblockingServer로 변경- HBase Thrift Server 시작
-
Hue Database 엔진 관련 에러
- hue 서비스 중지
node1서버에root로 ssh 접속- mysql 로그인
$> mysql -u root - hue 데이터베이스의 스키마 정보 확인
SELECT table_schema, table_name, engine FROM information_schema.tables WHERE engine = 'MyISAM' AND table_schema = 'hue'; - set_engine_innodb.ddl 파일 생성
$> mysql -u root -e \ "SELECT CONCAT('ALTER TABLE ',table_schema,'.',table_name,' engine=InnoDB;') \ FROM information_schema.tables \ WHERE engine = 'MyISAM' AND table_schema = 'hue';" \ | grep "ALTER TABLE hue" > /tmp/set_engine_innodb.ddl - set_engine_innodb.ddl 실행
$> mysql -u root < /tmp/set_engine_innodb.ddl
Hive External 테이블 생성 및 조회
-
External 테이블 생성
create external table if not exists SmartCar_Status_Info ( reg_date string, car_number string, tire_fl string, tire_fr string, tire_bl string, tire_br string, light_fl string, light_fr string, light_bl string, light_br string, engine string, break string, battery string ) partitioned by( wrk_date string ) row format delimited fields terminated by ',' stored as textfile location '/pilot-pjt/collect/car-batch-log/' -
Partition 정보 추가
wrk_data 는 작업했던 일자를 넣어야 함.(잘 모르겠으면/pilot-pjt/collect/car-batch-log/로 가서 확인)ALTER TABLE smartcar_status_info ADD PARTITION(wrk_date='20190607'); -
5개 조회
select * from smartcar_status_info limit 5; -
조건 조회 (1m16s 걸렸음;;)
select car_number, avg(battery) as battery_avg
from smartcar_status_info
where battery < 60
group by car_number;
Job Browser에서도 확인 가능
하이브를 이용한 HBase 데이터 검색
- HBaseStorageHandler를 이용해 External 테이블 만들기
CREATE EXTERNAL TABLE SmartCar_Drive_Info( r_key string, s date string, car_number string, speed_pedal string, break_pedal string, steer_angle string, direct_light string, speed string, area_number string) STORED BY 'org.apache.hadoop.hive.hbase.HBaseStorageHandler' WITH SERDEPROPERTIES ( "hbase.columns.mapping" = "cf1:date,cf1:car_number, cf1:speed_pedal, cf1:break_pedal, cf1:steer_angle, cf1:direct_light, cf1:speed, cf1:area_number") TBLPROPERTIES( "hbase.table.name" = "DriverCarInfo"); - 10건 조회
select * from smartcar_drive_info limit 10;
데이터셋 추가
스마트카 마스터 데이터와 스마트카 차량용품 구매 이력 데이터를 추가
-
폴더 생성
# car-master 폴더 생성 sudo -u hdfs hdfs dfs -mkdir /pilot-pjt/collect/car-master sudo -u hdfs hdfs dfs -chown admin /pilot-pjt/collect/car-master # buy-list 폴더 생성 sudo -u hdfs hdfs dfs -mkdir /pilot-pjt/collect/buy-list sudo -u hdfs hdfs dfs -chown admin /pilot-pjt/collect/buy-list -
hue 파일 브라우저 업로드 기능을 통해 데이터 업로드
-
External 테이블 생성
CREATE EXTERNAL TABLE SmartCar_Master (
car_number string,
sex string,
age string,
marriage string,
region string,
job string,
car_capacity string,
car_year string,
car_model string
)
row format delimited
fields terminated by '|'
stored as textfile
location '/pilot-pjt/collect/car-master'
CREATE EXTERNAL TABLE SmartCar_Item_BuyList ( car_number string, Item string, score string, month string ) row format delimited fields terminated by ',' stored as textfile location '/pilot-pjt/collect/buy-list' -
데이터 조회
select * from smartcar_masterselect * from smartcar_item_buylist
Spark 를 이용한 데이터 탐색
-
spark-shell 실행
$> spark-shell -
에러 발생
____ __ / __/__ ___ _____/ /__ _\ \/ _ \/ _ `/ __/ '_/ /___/ .__/\_,_/_/ /_/\_\ version 1.6.0 /_/ Using Scala version 2.10.5 (Java HotSpot(TM) 64-Bit Server VM, Java 1.7.0_67) Type in expressions to have them evaluated. Type :help for more information. 19/06/10 11:09:48 ERROR spark.SparkContext: Error initializing SparkContext. java.lang.IllegalArgumentException: Required executor memory (1024+384 MB) is above the max threshold (1024 MB) of this cluster! Please check the values of 'yarn.scheduler.maximum-allocation-mb' and/or 'yarn.nodemanager.resource.memory-mb'. -
spark-shell 실행 (with executor-memory option)
spark-shell --executor-memory 512MB -
에러 발생
____ __ / __/__ ___ _____/ /__ _\ \/ _ \/ _ `/ __/ '_/ /___/ .__/\_,_/_/ /_/\_\ version 1.6.0 /_/ Using Scala version 2.10.5 (Java HotSpot(TM) 64-Bit Server VM, Java 1.7.0_67) Type in expressions to have them evaluated. Type :help for more information. 19/06/10 11:11:01 ERROR spark.SparkContext: Error initializing SparkContext. org.apache.hadoop.security.AccessControlException: Permission denied: user=root, access=WRITE, inode="/user":hdfs:supergroup:drwxr-xr-x -
root 계정의 home 폴더 생성
sudo -u hdfs hdfs dfs -mkdir /user/root sudo -u hdfs hdfs dfs -chown root /user/root -
spark-shell 실행 (with executor-memory option)
spark-shell --executor-memory 512MB -
데이터셋 탐색
scala> val smartcar_master_df = sqlContext.sql("SELECT * FROM SmartCar_Master WHERE age >=18") scala> smartcar_master_df.show() scala> smartcar_master_df.saveAsTable("SmartCar_Master_Over18") scala> val smartcar_master_over18_df = sqlContext.sql("select * from smartcar_master_over18 where age > 30 and sex = '남'") scala> smartcar_master_over18_df.show() -
hue > hive query editor에서 동일한 쿼리 실행 후 실행시간 비교
테스트 데이터 생성
-
스마트카 정보 생성
$> cd /home/pilot-pjt/working/ # 스마트카 정보 $> java -cp bigdata.smartcar.loggen-1.0.jar com.wikibook.bigdata.smartcar.loggen.CarLogMain 20190610 100 & # 확인 $> tail -f /home/pilot-pjt/working/SmartCar/SmartCarStatusInfo_20190610.txt # tail 화면에서 더이상 데이터가 생성되지 않으면 프로세스 종료 $> ps -ef | grep smartcar.log $> pkill -f smartcar.log $> mv /home/pilot-pjt/working/SmartCar/SmartCarStatusInfo_20190610.txt /home/pilot-pjt/working/car-batch-log/ $> hdfs dfs -ls -R /pilot-pjt/collect/car-batch-log/ -
스마트카 실시간 운행 로그
$> cd /home/pilot-pjt/working/
# 스마트카 실시간 운행 정보
$> java -cp bigdata.smartcar.loggen-1.0.jar com.wikibook.bigdata.smartcar.loggen.DriverLogMain 20190610 100 &
# 확인
$> tail -f /home/pilot-pjt/working/driver-realtime-log/SmartCarDriverInfo.log
$> redis-cli
127.0.0.1:6379> smembers 20190610
1) "R0039-20190610000150"
2) "E0064-20190610000140"
3) "O0076-20190610000240"
4) "C0023-20190610000304"
5) "S0025-20190610000156"
# redis에 과속차량이 3건 이상 보이면 프로세스 종료
$> ps -ef | grep smartcar.log
$> pkill -f smartcar.log
Hue > Data Browsers > HBase메뉴에서DriverCarInfo테이블을 선택하여 운행 데이터가 잘 생성되었는지 확인 필요
(실행일 파라미터 값을20190610으로 했으면00000001609102-A0052, 00000001609102-B0006같은 로우키가 생김)
OOZIE
데이터 주제영역
| Subject1 | Subject2 | Subject3 | Subject4 | Subject5 | |
|---|---|---|---|---|---|
| 이용 테이블 | - 스마트카 마스터 데이터 - 스마트카 상태 정보 데이터 |
- 스마트카 마스터 데이터 - 스마트카 운전자 운행 데이터 |
스마트카 운전자 운행기록 정보 | 스마트카 상태 모니터링 정보 | - 스마트카 마스터 데이터 - 스마트카 차량요품 구매 이력 데이터 |
| 생성할 Mart 테이블 | Managed_SmartCar_Status_Info | Managed_SmartCar_Drive_Info | Managed_SmartCar_Symptom_Info | Managed_SmartCar_Emergency_Check_Info | Managed_SmartCar_Item_BuyList_Info |
Subject1. 스마트카 상태 정보 모니터링 워크플로 작성
Workflow
-
작업 폴더 생성
sudo -u hdfs hdfs dfs -mkdir /pilot-pjt/workflow sudo -u hdfs hdfs dfs -mkdir /pilot-pjt/workflow/subject1 sudo -u hdfs hdfs dfs -mkdir /pilot-pjt/workflow/subject2 sudo -u hdfs hdfs dfs -mkdir /pilot-pjt/workflow/subject3 sudo -u hdfs hdfs dfs -mkdir /pilot-pjt/workflow/subject4 sudo -u hdfs hdfs dfs -mkdir /pilot-pjt/workflow/subject5 sudo -u hdfs hdfs dfs -chown -R admin /pilot-pjt/workflow -
/pilot-pjt/workflow/subject1디렉토리 밑에 아래 3개 파일 추가-
create_table_managed_smartcar_status_info.hqlcreate table if not exists Managed_SmartCar_Status_Info ( car_number string, sex string, age string, marriage string, region string, job string, car_capacity string, car_year string, car_model string, tire_fl string, tire_fr string, tire_bl string, tire_br string, light_fl string, light_fr string, light_bl string, light_br string, engine string, break string, battery string, reg_date string ) partitioned by( biz_date string ) row format delimited fields terminated by ',' stored as textfile; -
alter_partition_smartcar_status_info.hqlalter table SmartCar_Status_Info add if not exists partition(wrk_date='${working_day}'); -
insert_table_managed_smartcar_status_info.hqlset hive.exec.dynamic.partition=true; set hive.exec.dynamic.partition.mode=nonstrict; insert overwrite table Managed_SmartCar_Status_Info partition(biz_date) select t1.car_number, t1.sex, t1.age, t1.marriage, t1.region, t1.job, t1.car_capacity, t1.car_year, t1.car_model, t2.tire_fl, t2.tire_fr, t2.tire_bl, t2.tire_br, t2.light_fl, t2.light_fr, t2.light_bl, t2.light_br, t2.engine, t2.break, t2.battery, t2.reg_date, substring(t2.reg_date, 0, 8) as biz_date from SmartCar_Master_Over18 t1 join SmartCar_Status_Info t2 on t1.car_number = t2.car_number and t2.wrk_date = '${working_day}';
-
-
Hue > Workflows > 편집기 > Workflow 메뉴에서 생성 버튼 클릭
-
ToolBox에서 작업 선택 후 Hive Server2작업을 작업 노드에 Drag & Drop
순서 파일명 매개변수 1 create_table_managed_smartcar_status_info.hql- 2 alter_partition_smartcar_status_info.hqlworking_day=${today} 3 insert_table_managed_smartcar_status_info.hqlworking_day=${today} 작업을 바로 실행하고 싶을땐 매개변수를 오늘날짜로 설정해주면 됨 (
working_day=20190610) -
Workflow 이름을
Subject1-Workflow로 설정 후 저장, 제출 버튼 클릭
Coordinator
-
Hue > Workflows > 편집기 > Coordinator메뉴에서 생성 버튼 클릭 -
이름은
Subject1-Coordinator로 설정 -
워크플로는 앞서 작성했던
Subject1-Workflow선택 -
작업 간격 설정
항목 설정 값 실행 간격 매일, 01시 시작 일자 2019년 6월 9일 00시 00분 종료 일자 2019년 6월 17일 23시 59분 시간대 Asia/Seoul -
매개변수 설정 (
today)${coord:formatTime(coord:dateTzOffset(coord:nominalTime(), "Asia/Seoul"), 'yyyyMMdd')} -
저장 및 제출
-
Hue > Workflows > 대시보드 > Coordinator에서 확인 -
작업이 정상적으로 실행됐다면 Hive Editor에서 아래 쿼리를 통해 확인 가능
select * from managed_smartcar_status_info where biz_date = '20190610' limit 10;
Subject2. 스마트카 운전자 운행 기록 정보 워크를로 작성
Workflow
-
/pilot-pjt/collect/drive-log/디렉토리 생성sudo -u hdfs hdfs dfs -mkdir /pilot-pjt/collect/drive-log/ sudo -u hdfs hdfs dfs -chown admin /pilot-pjt/collect/drive-log/ -
/pilot-pjt/workflow/subject2디렉토리 밑에 아래 4개 파일 추가-
create_table_smartcar_drive_info_2.hqlcreate external table if not exists SmartCar_Drive_Info_2 ( r_key string, date string, car_number string, speed_pedal string, break_pedal string, steer_angle string, direct_light string, speed string, area_number string ) partitioned by( wrk_date string ) row format delimited fields terminated by ',' stored as textfile location '/pilot-pjt/collect/drive-log/' -
insert_table_smartcar_drive_info_2.hqlset hive.exec.dynamic.partition=true; set hive.exec.dynamic.partition.mode=nonstrict; insert overwrite table SmartCar_Drive_Info_2 partition(wrk_date) select r_key , date , car_number , speed_pedal , break_pedal , steer_angle , direct_light , speed , area_number , substring(date, 0, 8) as wrk_date from SmartCar_Drive_Info where substring(date, 0, 8) = '${working_day}'; -
create_table_managed_smartcar_drive_info.hqlcreate table if not exists Managed_SmartCar_Drive_Info ( car_number string, sex string, age string, marriage string, region string, job string, car_capacity string, car_year string, car_model string, speed_pedal string, break_pedal string, steer_angle string, direct_light string, speed string, area_number string, reg_date string ) partitioned by( biz_date string ) row format delimited fields terminated by ',' stored as textfile; -
insert_table_managed_smartcar_drive_info.hqlset hive.exec.dynamic.partition=true; set hive.exec.dynamic.partition.mode=nonstrict; insert overwrite table Managed_SmartCar_drive_Info partition(biz_date) select t1.car_number, t1.sex, t1.age, t1.marriage, t1.region, t1.job, t1.car_capacity, t1.car_year, t1.car_model, t2.speed_pedal, t2.break_pedal, t2.steer_angle, t2.direct_light , t2.speed , t2.area_number , t2.date, substring(t2.date, 0, 8) as biz_date from SmartCar_Master_Over18 t1 join SmartCar_Drive_Info_2 t2 on t1.car_number = t2.car_number and substring(t2.date,0,8) = '${working_day}';
-
-
Hue > Workflows > 편집기 > Workflow 메뉴에서 생성 버튼 클릭
-
ToolBox에서 작업 선택 후 Hive Server2작업을 작업 노드에 Drag & Drop
순서 파일명 매개변수 1 create_table_smartcar_drive_info_2.hql- 2 insert_table_smartcar_drive_info_2.hqlworking_day=${today} 3 create_table_managed_smartcar_drive_info.hql- 4 insert_table_managed_smartcar_drive_info.hqlworking_day=${today} 작업을 바로 실행하고 싶을땐 매개변수를 오늘날짜로 설정해주면 됨 (
working_day=20190610) -
Workflow 이름을
Subject2-Workflow로 설정 후 저장, 제출 버튼 클릭
Coordinator
-
Hue > Workflows > 편집기 > Coordinator메뉴에서 생성 버튼 클릭 -
이름은
Subject2-Coordinator로 설정 -
워크플로는 앞서 작성했던
Subject2-Workflow선택 -
작업 간격 설정
항목 설정 값 실행 간격 매일, 02시 시작 일자 2019년 6월 9일 00시 00분 종료 일자 2019년 6월 17일 23시 59분 시간대 Asia/Seoul -
매개변수 설정 (
today)${coord:formatTime(coord:dateTzOffset(coord:nominalTime(), "Asia/Seoul"), 'yyyyMMdd')} -
저장 및 제출
-
Hue > Workflows > 대시보드 > Coordinator에서 확인 -
작업이 정상적으로 실행됐다면 Hive Editor에서 아래 쿼리를 통해 확인 가능
select * from managed_smartcar_drive_info where biz_date = '20190610' limit 10;
Subject3. 이상 운전 패턴 스마트카 정보 워크플로 작성
Workflow
-
/pilot-pjt/workflow/subject3디렉토리 밑에 아래 2개 파일 추가-
create_table_managed_smartcar_symptom_info.hqlcreate table if not exists Managed_SmartCar_Symptom_Info ( car_number string, speed_p_avg string, speed_p_symptom string, break_p_avg string, break_p_symptom string, steer_a_cnt string, steer_p_symptom string, biz_date string ) row format delimited fields terminated by ',' stored as textfile; -
insert_table_managed_smartcar_symptom_info.hqlinsert into table Managed_SmartCar_Symptom_Info select t1.car_number, t1.speed_p_avg_by_carnum, case when (abs((t1.speed_p_avg_by_carnum - t3.speed_p_avg) / t4.speed_p_std)) > 2 then '비정상' else '정상' end as speed_p_symptom_score, t1.break_p_avg_by_carnum, case when (abs((t1.break_p_avg_by_carnum - t3.break_p_avg) / t4.break_p_std)) > 2 then '비정상' else '정상' end as break_p_symptom_score, t2.steer_a_count, case when (t2.steer_a_count) > 1000 then '비정상' else '정상' end as steer_p_symptom_score, t1.biz_date from (select car_number, biz_date, avg(speed_pedal) as speed_p_avg_by_carnum, avg(break_pedal) as break_p_avg_by_carnum from managed_smartcar_drive_info where biz_date = '${working_day}' group by car_number, biz_date) t1 join (select car_number, count(*) as steer_a_count from managed_smartcar_drive_info where steer_angle in ('L2','L3','R2','R3') and biz_date = '${working_day}' group by car_number) t2 on t1.car_number = t2.car_number , (select avg(speed_pedal) as speed_p_avg, avg(break_pedal) as break_p_avg from managed_smartcar_drive_info ) t3, (select stddev_pop(s.speed_p_avg_by_carnum) as speed_p_std, stddev_pop(s.break_p_avg_by_carnum) as break_p_std from (select car_number, avg(speed_pedal) as speed_p_avg_by_carnum, avg(break_pedal) as break_p_avg_by_carnum from managed_smartcar_drive_info group by car_number) s) t4
-
-
Hue > Workflows > 편집기 > Workflow 메뉴에서 생성 버튼 클릭
-
ToolBox에서 작업 선택 후 Hive Server2작업을 작업 노드에 Drag & Drop
순서 파일명 매개변수 1 create_table_managed_smartcar_symptom_info.hql- 2 insert_table_managed_smartcar_symptom_info.hqlworking_day=${today} 작업을 바로 실행하고 싶을땐 매개변수를 오늘날짜로 설정해주면 됨 (
working_day=20190610) -
Workflow 이름을
Subject3-Workflow로 설정 후 저장, 제출 버튼 클릭
Coordinator
-
Hue > Workflows > 편집기 > Coordinator메뉴에서 생성 버튼 클릭 -
이름은
Subject3-Coordinator로 설정 -
워크플로는 앞서 작성했던
Subject3-Workflow선택 -
작업 간격 설정
항목 설정 값 실행 간격 매일, 02시 시작 일자 2019년 6월 9일 00시 00분 종료 일자 2019년 6월 17일 23시 59분 시간대 Asia/Seoul -
매개변수 설정 (
today)${coord:formatTime(coord:dateTzOffset(coord:nominalTime(), "Asia/Seoul"), 'yyyyMMdd')} -
저장 및 제출
-
Hue > Workflows > 대시보드 > Coordinator에서 확인 -
작업이 정상적으로 실행됐다면 Hive Editor에서 아래 쿼리를 통해 확인 가능
SELECT
car_number,
cast(speed_p_avg as int),
speed_p_symptom,
cast(break_p_avg as float),
break_p_symptom,
cast(steer_a_cnt as int),
steer_p_symptom,
biz_date
FROM managed_smartcar_symptom_info
where biz_date = '20190610'
Subject4. 긴급 점검이 필요한 스마트카 정보 워크플로 작성
Workflow
-
/pilot-pjt/workflow/subject4디렉토리 밑에 아래 2개 파일 추가-
create_table_managed_smartcar_emergency_check_info.hqlcreate table if not exists Managed_SmartCar_Emergency_Check_Info ( car_number string, tire_check string, light_check string, engine_check string, break_check string, battery_check string, biz_date string ) row format delimited fields terminated by ',' stored as textfile; -
insert_table_managed_smartcar_emergency_check_info.hqlinsert into table Managed_SmartCar_Emergency_Check_Info select t1.car_number, t2.symptom as tire_symptom, t3.symptom as light_symptom, t4.symptom as engine_symptom, t5.symptom as break_symptom, t6.symptom as battery_symptom, t1.biz_date from (select distinct car_number as car_number, biz_date from managed_smartcar_status_info where biz_date = '${working_day}') t1 left outer join ( select car_number, avg(tire_fl) as tire_fl_avg , avg(tire_fr) as tire_fr_avg , avg(tire_bl) as tire_bl_avg , avg(tire_br) as tire_br_avg , '타이어 점검' as symptom from managed_smartcar_status_info where biz_date ='${working_day}' group by car_number having tire_fl_avg < 80 or tire_fr_avg < 80 or tire_bl_avg < 80 or tire_br_avg < 80 ) t2 on t1.car_number = t2.car_number left outer join ( select distinct car_number, '라이트 점검' as symptom from managed_smartcar_status_info where biz_date = '${working_day}' and (light_fl = '2' or light_fr = '2' or light_bl = '2' or light_br = '2')) t3 on t1.car_number = t3.car_number left outer join ( select distinct car_number, '엔진 점검' as symptom from managed_smartcar_status_info where biz_date = '${working_day}' and engine = 'C' ) t4 on t1.car_number = t4.car_number left outer join ( select distinct car_number, '브레이크 점검' as symptom from managed_smartcar_status_info where biz_date = '${working_day}' and break = 'C' ) t5 on t1.car_number = t5.car_number left outer join (select car_number, avg(battery) as battery_avg, '배터리 점검' as symptom from managed_smartcar_status_info where biz_date = '${working_day}' group by car_number having battery_avg < 30 ) t6 on t1.car_number = t6.car_number where t2.symptom is not null or t3.symptom is not null or t4.symptom is not null or t5.symptom is not null or t6.symptom is not null
-
-
Hue > Workflows > 편집기 > Workflow 메뉴에서 생성 버튼 클릭
-
ToolBox에서 작업 선택 후 Hive Server2작업을 작업 노드에 Drag & Drop
순서 파일명 매개변수 1 create_table_managed_smartcar_emergency_check_info.hql- 2 insert_table_managed_smartcar_emergency_check_info.hqlworking_day=${today} 작업을 바로 실행하고 싶을땐 매개변수를 오늘날짜로 설정해주면 됨 (
working_day=20190610) -
Workflow 이름을
Subject4-Workflow로 설정 후 저장, 제출 버튼 클릭
Coordinator
-
Hue > Workflows > 편집기 > Coordinator메뉴에서 생성 버튼 클릭 -
이름은
Subject4-Coordinator로 설정 -
워크플로는 앞서 작성했던
Subject4-Workflow선택 -
작업 간격 설정
항목 설정 값 실행 간격 매일, 02시 시작 일자 2019년 6월 9일 00시 00분 종료 일자 2019년 6월 17일 23시 59분 시간대 Asia/Seoul -
매개변수 설정 (
today)${coord:formatTime(coord:dateTzOffset(coord:nominalTime(), "Asia/Seoul"), 'yyyyMMdd')} -
저장 및 제출
-
Hue > Workflows > 대시보드 > Coordinator에서 확인 -
작업이 정상적으로 실행됐다면 Hive Editor에서 아래 쿼리를 통해 확인 가능
select * from managed_smartcar_emergency_check_info where biz_date = '20190610'
Subject5. 스마트카 운전자 차량용품 구매 이력 정보 워크플로 작성
Workflow
-
/pilot-pjt/workflow/subject5디렉토리 밑에 아래 3개 파일 추가-
create_table_managed_smartcar_item_buylist_info.hqlcreate table if not exists Managed_SmartCar_Item_BuyList_Info ( car_number string, sex string, age string, marriage string, region string, job string, car_capacity string, car_year string, car_model string, item string, score string ) partitioned by( biz_month string ) row format delimited fields terminated by ',' stored as textfile; -
insert_table_managed_smartcar_item_buylist_info.hqlset hive.exec.dynamic.partition=true; set hive.exec.dynamic.partition.mode=nonstrict; insert overwrite table Managed_SmartCar_Item_BuyList_Info partition(biz_month) select t1.car_number, t1.sex, t1.age, t1.marriage, t1.region, t1.job, t1.car_capacity, t1.car_year, t1.car_model, t2.item, t2.score, t2.month as biz_month from SmartCar_Master_Over18 t1 join SmartCar_Item_Buylist t2 on t1.car_number = t2.car_number where t2.month = '201606' -
local_save_managed_smartcar_item_buylist_info.hqlinsert overwrite local directory '/tmp/pilot-pjt/item-buy-list' ROW FORMAT DELIMITED FIELDS TERMINATED BY ',' select car_number, concat_ws("," , collect_set(item)) from managed_smartcar_item_buylist_info group by car_number
-
-
Hue > Workflows > 편집기 > Workflow 메뉴에서 생성 버튼 클릭
-
ToolBox에서 작업 선택 후 Hive Server2작업을 작업 노드에 Drag & Drop
순서 파일명 매개변수 1 create_table_managed_smartcar_item_buylist_info.hql- 2 insert_table_managed_smartcar_item_buylist_info.hql- 3 local_save_managed_smartcar_item_buylist_info.hql- -
Workflow 이름을
Subject5-Workflow로 설정 후 저장, 제출 버튼 클릭
Coordinator
-
Hue > Workflows > 편집기 > Coordinator메뉴에서 생성 버튼 클릭 -
이름은
Subject5-Coordinator로 설정 -
워크플로는 앞서 작성했던
Subject5-Workflow선택 -
작업 간격 설정
항목 설정 값 실행 간격 매일, 02시 시작 일자 2019년 6월 9일 00시 00분 종료 일자 2019년 6월 17일 23시 59분 시간대 Asia/Seoul -
매개변수 설정 (
today)${coord:formatTime(coord:dateTzOffset(coord:nominalTime(), "Asia/Seoul"), 'yyyyMMdd')} -
저장 및 제출
-
Hue > Workflows > 대시보드 > Coordinator에서 확인 -
작업이 정상적으로 실행됐다면 Hive Editor에서 아래 쿼리를 통해 확인 가능
SELECT * FROM managed_smartcar_item_buylist_info where biz_month = '201606' -
파일 확인 (
root계정으로node1에 ssh 접속)more /tmp/pilot-pjt/item-buy-list/000000_0폴더를 삭제하고 생성하는 작업이 필요하기 때문에 모든 권한을 줄 수 있는
tmp폴더 밑에 작업하도록 설정하였음
7. 빅데이터 분석
Impala 설치
- Impala 서비스 추가 후
CM 홈 > Hue > 구성화면에서 Impala 서비스 항목을 Impala로 선택 - Hue Stale Deploy
- Hue > Query Editor 밑에 Impala 추가된거 확인
Sqoop 설치
Zeppelin 설치
-
Zeppelin 설치
cd /home/pilot-pjt
wget http://archive.apache.org/dist/zeppelin/zeppelin-0.6.2/zeppelin-0.6.2-bin-all.tgz
tar -xvf zeppelin-0.6.2-bin-all.tgz

cd /home/pilot-pjt/zeppelin-0.6.2-bin-all/conf/
cp zeppelin-env.sh.template zeppelin-env.sh
vi zeppelin-env.sh
########## zepplin-env.sh 시작 ##########
...
export JAVA_HOME=/usr/java/jdk1.7.0_67-cloudera
...
export HADOOP_CONF_DIR=/etc/hadoop/conf
...
########## zepplin-env.sh 끝 ##########

#하이브 임시 디렉토리 권한 변경
chmod 777 /tmp/hive
# 하이브 설정 파일 복사
cp /etc/hive/conf/hive-site.xml /home/pilot-pjt/zeppelin-0.6.2-bin-all/conf/

cd /home/pilot-pjt/zeppelin-0.6.2-bin-all/conf/
cp zeppelin-site.xml.template zeppelin-site.xml
vi zeppelin-site.xml
########## zeppelin-site.xml 시작 ##########
<property>
    <name>zeppelin.server.port</name>
    <value>8081</value>
    <description>Server port.</description>
</property>
########## zeppelin-site.xml 끝 ##########

cd
vi .bash_profile
########## .bash_profile 시작 ##########
...
PATH=$PATH:/home/pilot-pjt/zeppelin-0.6.2-bin-all/bin
export PATH
########## .bash_profile 끝 ##########
source .bash_profile
zeppelin-daemon.sh start
zeppelin-daemon.sh status
tail -f /home/pilot-pjt/zeppelin-0.6.2-bin-all/logs/zeppelin-root-node1.log
Impala를 활용한 데이터 실시간 분석
Hue > Query Editors > Impala- Impala Editor에서 하이브 테이블 조회
--운전 패턴 스마트카 정보 조회 select * from managed_smartcar_symptom_info where biz_date = '20190610' --긴급 점검이 필요한 스마트카 조회 select * from managed_smartcar_emergency_check_info where biz_date = '20190610' --스마트카 차량요품 구매 이력 정보 조회 select * from managed_smartcar_item_buylist_info where biz_month = '201606' - 지역별 평균 속도가 가장 높은 스마트카 조회
select T2.area_number, T2.car_number, T2.speed_avg
from (
    select
            T1.area_number,
            T1.car_number,
            T1.speed_avg,
            rank() over(partition by T1.area_number order by T1.speed_avg desc) as ranking
    from (
            select area_number, car_number, avg(cast(speed as int)) as speed_avg
            from  managed_smartcar_drive_info
            group by area_number, car_number
            ) T1
) T2
where ranking = 1
Zeppelin을 이용한 실시간 분석
-
Zeppelin > Notebook > Create new note메뉴 선택 -
NoteName은
SmartCar-Project로 입력 후CreateNote버튼 클릭 -
zeppelin 사용하기
%sh hdfs dfs -cat /user/hive/warehouse/managed_smartcar_drive_info/biz_date=20190610/* | head --- %spark val driveData = sc.textFile("hdfs://node1:8020/user/hive/warehouse/managed_smartcar_drive_info/biz_date=20190610/*") case class DriveInfo(car_num: String, sex: String, age: String, marriage: String, region: String, job: String, car_capacity: String, car_year: String, car_model: String, speed_pedal: String, break_pedal: String, steer_angle: String, direct_light: String, speed: String, area_num: String, date: String) val drive = driveData.map(sd=>sd.split(",")).map( sd=>DriveInfo(sd(0).toString, sd(1).toString, sd(2).toString, sd(3).toString, sd(4).toString, sd(5).toString, sd(6).toString, sd(7).toString, sd(8).toString, sd(9).toString, sd(10).toString,sd(11).toString, sd(12).toString,sd(13).toString,sd(14).toString,sd(15).toString ) ) drive.toDF().registerTempTable("DriveInfo") --- %spark.sql select T1.area_num, T1.avg_speed from (select area_num, avg(speed) as avg_speed from DriveInfo group by area_num ) T1 order by T1.avg_speed desc --- # 동적 변수를 사용하여 평균 속도를 바꿔가면서 결과 확인 %spark.sql select T1.area_num, T1.avg_speed from (select area_num, avg(speed) as avg_speed from DriveInfo group by area_num having avg_speed >= ${AvgSpeed=60} ) T1 order by T1.avg_speed desc -
스케쥴러 기능도 있음 (상단 시계모양 아이콘)
Mahout을 이용한 데이터 마이닝
Spark ML로 대체
참고자료
실무 프로젝트로 배우는 빅데이터 기술
『실무 프로젝트로 배우는 빅데이터 기술』 예제 코드
실무로 배우는 빅데이터 기술 확장하기