
Vue Router
Server-side Routing(MPA) VS Client-side Routing(SPA)
| MPA | SPA |
|---|---|
 |
 |
이미지 출처 : Vue Mastery-facebook
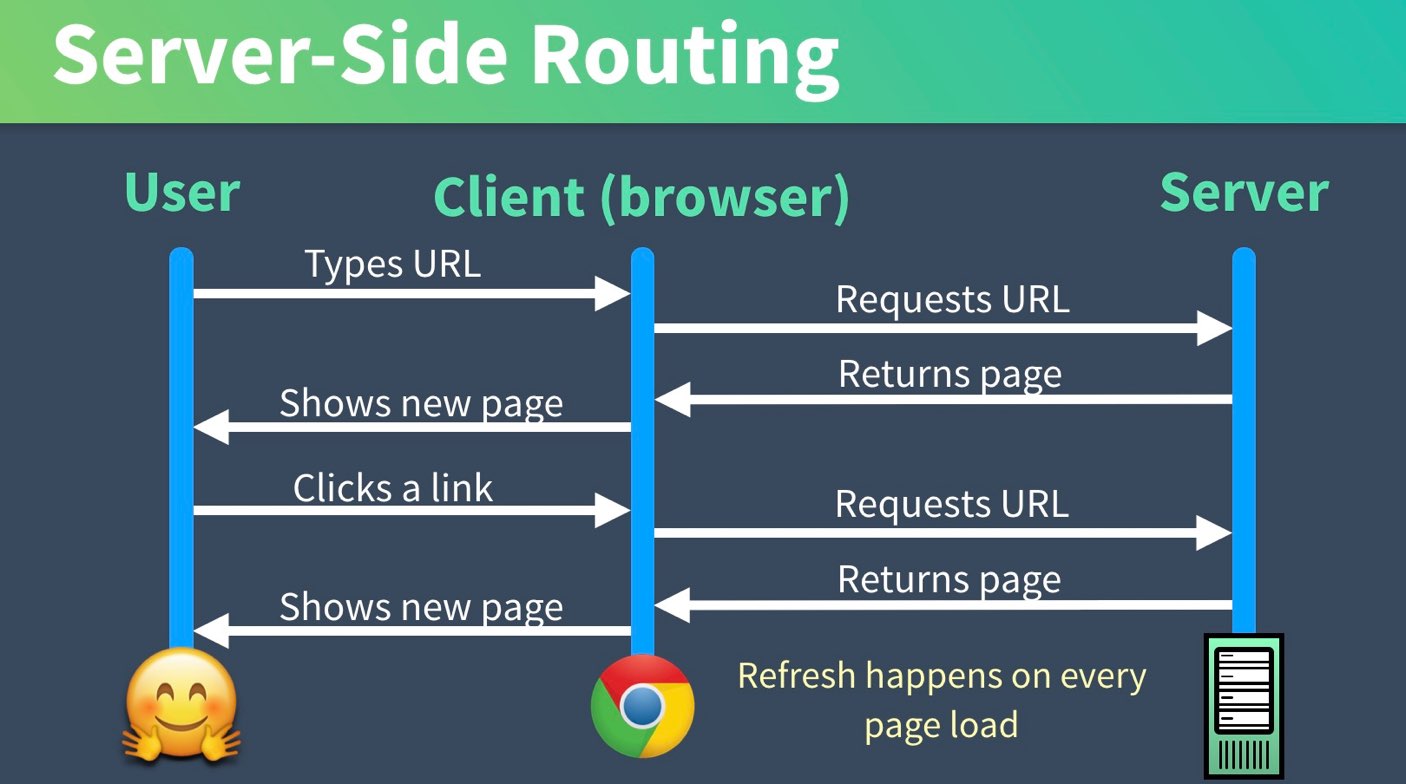
Server-side Routing(MPA)
- client 가 URL을 변경 요청할 때마다 서버로 요청이 가고 서버로부터 페이지를 Return 받는 방식
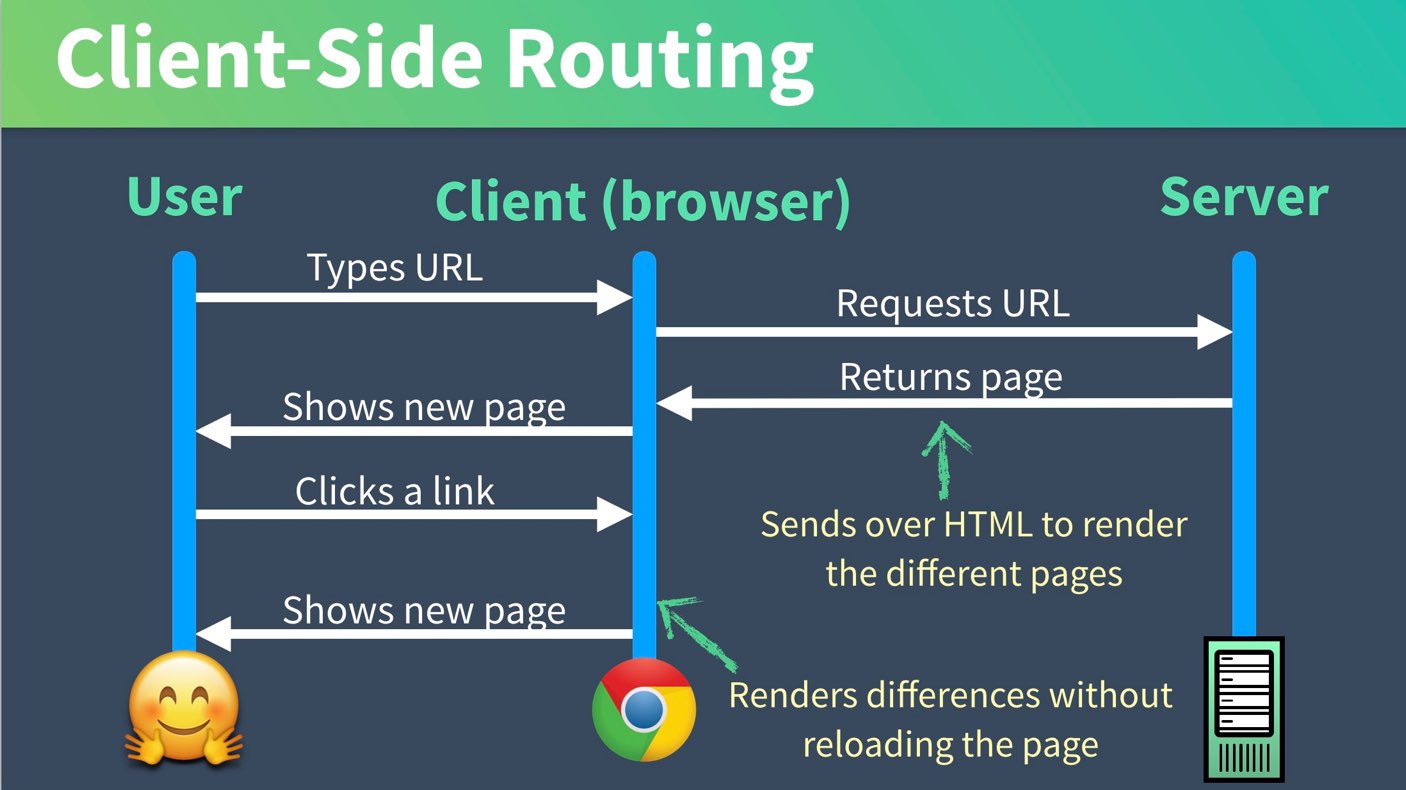
Client-side Routing(SPA)
- SPA에서 컨텐츠를 탐색하기 위한 방식
(SPA는 하나의 페이지에서 모든 리소스들을 로드한 후 다이나믹하게 화면을 업데이트 함)
이번 강의에서는
Client-side Routing에 대해 학습할 예정이고 추후 SSR(Server Side Rendering)에 대해 다룰 예정임
(SSR에 대한 내용이 궁금하시다면 velog - SPA에서의 SSR과 CSR을 참고 하시기 바랍니다)
😎 Vue 에서는 VueRouter라는 공식 Routing Solution을 제공함
Vue Router Install
Vue CLI
$> vue add router
vue-cli로 프로젝트를 만들면서Router를 추가하지 않았을 경우에만
vue add를 통해 추가하면 됨
NPM
$> npm install vue-router
npm으로 설치할 경우 약간의 추가 설정이 필요함
(👇자세한 내용은 바로 밑에 설명)
Project에 어떻게 추가되어야 하는지 확인
package.json
"dependencies": {
  "vue": "^2.6.10",
  "vue-router": "^3.1.3",
  (...)
},
router.js
필요한 Library Import
vue와vue-router는 반드시 import- routing 해 줄 컴포넌트들도 import 해야 함 (dynamic import 방식도 지원)
import Vue from "vue";
import VueRouter from "vue-router";
import HomeComponent from "../views/HomeComponent.vue";
명시적 사용 선언
Vue.use()를 통해 명시적으로 라우터를 추가해야 사용 가능Vue.use(VueRouter);
Routing 설정
-
routes에 routing 요소들을 추가 -
new VueRouter()할 때 mode는history모드 선택하는 것을 추천const routes = [ { path: "/", name: "home", component: HomeComponent }, (...) ]; const router = new VueRouter({ mode: "history", base: process.env.BASE_URL, routes });
Vue Router는 기본적으로hash모드 (#을 기준으로 routing이 되는 것) 를 지원하지만
history모드를 사용하는 것이 좀 더 익숙하고 직관적인 방법인 것 같습니다 ^^
Module Export
export default router;
main.js
필요한 Library Import
import Vue from "vue";
import App from "./App.vue";
import router from "./router";
router Module 사용
new Vue({
  router,
  render: (h) => h(App),
}).$mount("#app");
Route 설정 자세히 알아보기
기본적인 속성
- path : 사용자가 연결될 실제 경로
- name : route의 이름
- component : 해당 경로에서 렌더링 할 컴포넌트를 지정
name을 사용하여 routing 하는 것이 좀 더 유연하고 편리함const router = new VueRouter({ routes: [ { path: "/users", name: "users", component: UsersComponent, }, ... ] })
/products/1 같이 path parameter 를 사용하려면 어떻게 해야 할까❓
-
routes 속성 설정 시 아래와 같이
path에:parameter추가const router = new VueRouter({ routes: [ { path: "/products/:productId", name: "productDetail", component: ProductDetail, }, ], }); -
path parameter 접근
<template> {{ $route.params.productId }} </template>
🤦 /about 과 /about-us 가 동일한 Component를 로드해야 할 경우
-
redirect속성 사용const router = new VueRouter({ routes: [ { path: "/about-us", redirect: { name: "about" }, }, ], }); -
alias속성 사용const router = new VueRouter({ routes: [ { path: "/about", name: "about", component: About, alias: "/about-us", }, ], });
Vue Router 사용하기
App.vue
<template>
  <header>
    <nav>
      <router-link to="/">Home</router-link>
      <router-link :to="{ name: 'about' }">About</router-link>
      <router-link :to="{ name: 'product'}">Products</router-link>
    </nav>
  </header>
  <main>
    <router-view />
  </main>
</template>
<router-link>
- Vue Router 가 제공하는 컴포넌트 (전역에서 사용 가능)
- to 속성 작성 시
path뿐만 아니라name을 활용하여 routing 가능 <router-link>의to속성 값을 작성할 때 name을 활용하는 것이 좀 더 유연한 방법이 될 수 있음
(각각의 컴포넌트들을 수정할 필요 없이router.js만 잘 관리하면 되기 때문)
<router-view />
- routing 될 컴포넌트가 페이지에 렌더링 될 자리 표시 (place holder 역할)
params 사용하기
-
router-link에params객체를 같이 선언<router-link :to="{ name: 'productDetail', params: { productId: 123, productCode: 'S001' }}">ProductDetail</router-link> -
ProductDetail.vue<template> <h1>상품 상세 화면</h1> <p>상품 ID : {{ this.$route.params.productId }}</p> <p>상품코드 : {{ this.$route.params.productCode }}</p> </template> -
this.$route를 통해 현재 라우트 정보를 확인할 수 있고$route는path, params, query같은 속성들을 가지고 있음
⚠️ 주의사항 ($router ≠ $route)
this.$router 는 router.js 에서 new VueRouter() 를 통해 생성한 router를 가리키는 객체임
query 사용하기
-
router-link에query객체를 같이 선언<router-link :to="{ path: 'product', query: { company: 'apple', support: 'welfare' }}">Products</router-link> -
ProductList.vue파일 수정<template> <h1>상품 리스트</h1> <p>회사 : {{ this.$route.query.company }}</p> <p>지원방법 : {{ this.$route.query.support }}</p> </template>
외부에서도 접근 가능하도록 하기 위해서는
path parameter를 지원하거나query방식을 지원해야 함 (params방식은 외부 접근 X)
Code Splitting & Lazy Loading

이미지 출처 : 자이언트 펭TV
SPA 로 작성한 어플리케이션의 규모가 점점 커진다면
화면 렌더링을 위한 초기 리소스를 다운받는 부담이 매우 커지기 때문에
code-splitting을 통한Lazy loading에 대한 고려가 필요함!!🤔
Code Splitting
-
component 속성 선언 시
dynamic import형태로 작성할 경우 별도의 파일로 번들링 됨const ProductList = () => import("../views/ProductList.vue"); const router = new VueRouter({ routes: [ { path: "/product", name: "product", component: ProductList, }, ], }); -
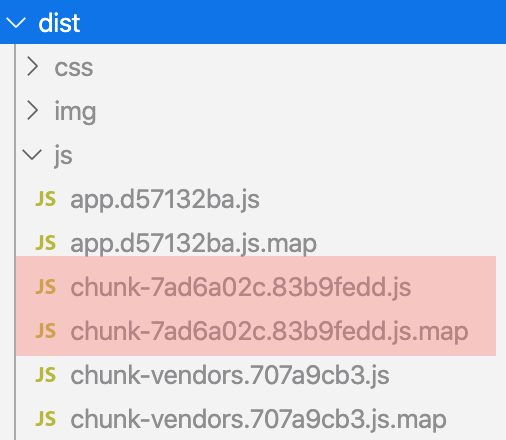
npm run build를 실행하면dist폴더 밑에 별도의 배포용 파일이 떨어지게 됨
-
여러 컴포넌트들을 하나의 그룹으로 묶어서 번들링 하고 싶다면
dynamic import구문에webpackChunkName을 같이 작성해 주면 됨const ProductList = () => import(/* webpackChunkName: "product" */ "../views/ProductList.vue"); const ProductDetail = () => import(/* webpackChunkName: "product" */ "../views/ProductDetail.vue"); -
위 예제와 같이 설정 후
npm run build하면
ProductList,ProductDetail컴포넌트는product.[hash값].js파일로 번들링 됩니다😎
🌈 ES6 문법
Arrow Function
-
function 키워드 대신 화살표(=>)를 사용하여 함수를 선언할 수 있음
// ES5
const ProductList = function () {
  return import("../views/ProductList.vue");
};

// ES6 (Arrow Function)
const ProductList = () => {
  return import(/* webpackChunkName: "product" */ "../views/ProductList.vue");
};

// ES6 Shortcut (return 되는 인자가 하나일 경우)
const ProductList = () => import(/* webpackChunkName: "product" */ "../views/ProductList.vue");
자세한 내용은 아래 글을 확인하시기 바랍니다.
ES6 화살표 함수(arrow function) 변경점 요약 (사용법, this등) -
// ES5 const ProductList = function() { return import("../views/ProductList.vue") } // ES6 (Arrow Function) const ProductList = () => { return import(/* webpackChunkName: "product" */ "../views/ProductList.vue")} // ES6 Shortcut (return 되는 인자가 하나일 경우) const ProductList = () => import(/* webpackChunkName: "product" */ '../views/ProductList.vue') -
화살표가 두개인 함수는 머지 ???
👉 Currying Function자세한 내용은 아래 글을 확인하시기 바랍니다.const add = function (x, y) { return x + y; }; const add1 = (x, y) => x + y; add1(2, 3); //=> 5 const add2 = (x) => (y) => x + y; add2(2)(3); // 5 add2(2); // y => x + y
Lazy Loading
route 설정 시 dynamic import 형태로 component 속성을 선언했다면
처음부터 모든 자원을 Loading 하는 것이 아니라 해당 경로 요청 시 필요한 자원을 load 하게 됨
⚠️ but, prefetch 기능을 끄지 않으면 lazy loading을 제대로 테스트 할 수 없음
😅
prefetch
vue-cli3.x 버전부터dynamic import를 통해 만들어진 분리된 chunk 파일들이 html 상단에prefetch로 태그됨prefetch로 선언된 리소스들은 브라우저가 미리 캐시하게 됨<!DOCTYPE html> <html lang="en"> <head> (...) <!--prefetch 확인!!--> <link href="/js/product.js" rel="prefetch" /> <link href="/js/app.js" rel="preload" as="script" /> <link href="/js/chunk-vendors.js" rel="preload" as="script" /> </head> <body> <div id="app"></div> <!-- built files will be auto injected --> <script type="text/javascript" src="/js/chunk-vendors.js"></script> <script type="text/javascript" src="/js/app.js"></script> </body> </html>
prefetch off
-
vue.config.js수정module.exports = { ... // prefetch 기능 off chainWebpack: (config) => { config.plugins.delete('prefetch') } };
lazy loading과prefetch관련된 자세한 내용은 Jeong Woo Ahn님의 블로그 를 참고하시기 바랍니다 ^^
Vuex
Vuex
👉 Vue.js 애플리케이션에 대한 상태 관리 패턴 + 라이브러리
Vuex 의 필요성
Application 규모가 커지면서 구조가 복잡해진다면 ❓
이미지 출처 : Vuex Explained Visually
- 서로 멀리 떨어져 있는 Component 들 간에 통신이 필요하다면 매우 비 효율적인 작업이 발생할 수 있음
(Props&Emit Event혹은EventBus등을 사용할 수 있지만 코드가 지나치게 복잡해질 수 있음)
Application 이 단순하다면
EventBus로도 충분히 커버 가능합니다 :)
모든 컴포넌트에 대한 중앙 집중식 저장소가 있다면 매우 효율적이지 않을까 ❓
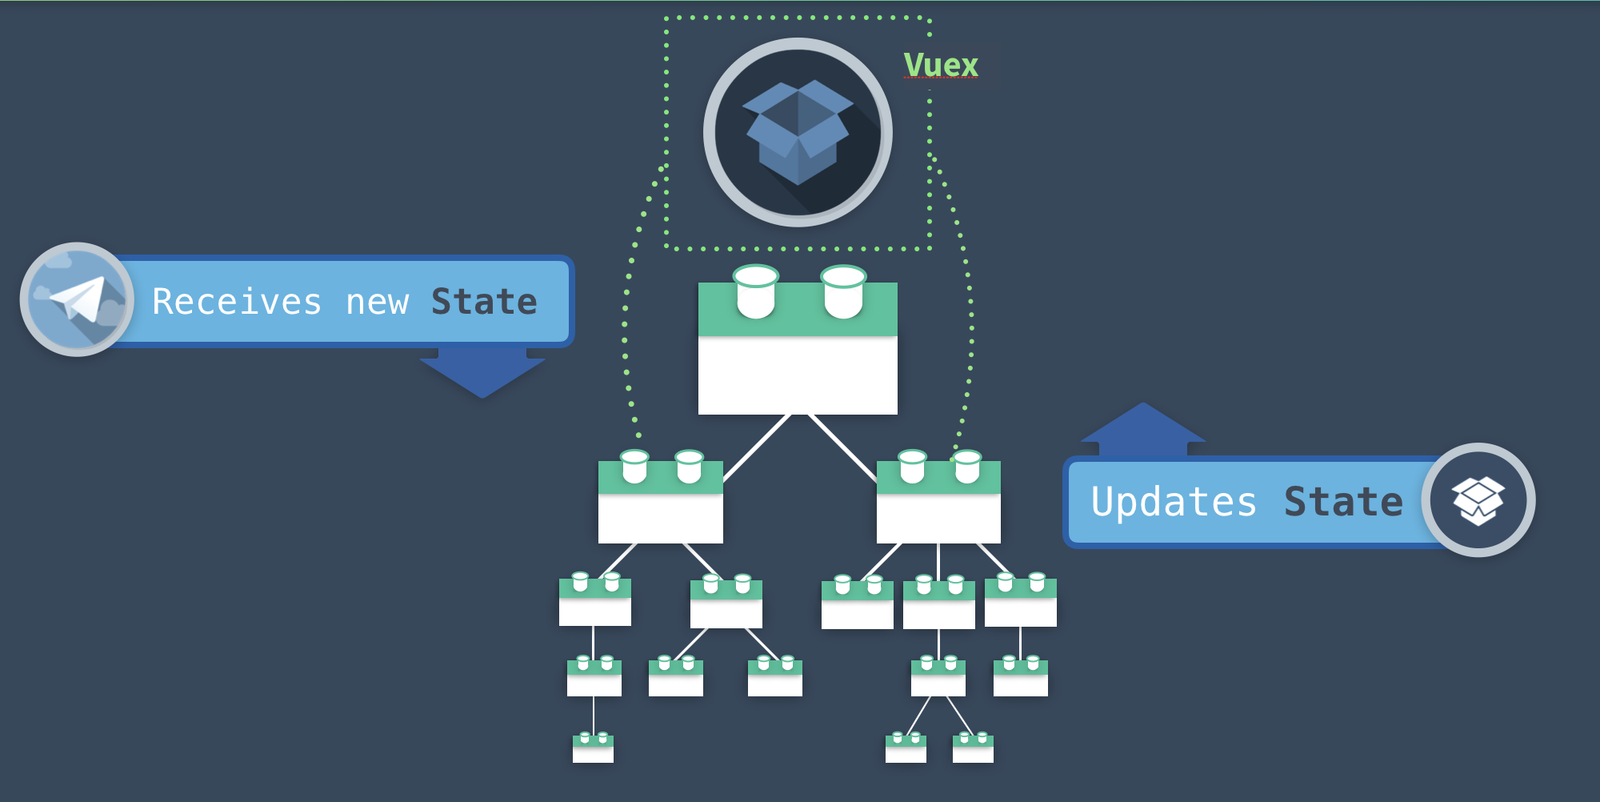
이미지 출처 : Vuex Explained Visually
Vuex도 결국Vue로 작성되었기 때문에Vuex가 관리하는state들은 Vue instance의 data 같이 reactive 함
reactive 하다는게 뭐지?? 라고 생각이 드신다면...
lecture.03 - Vue.js Reactivity System 을 참고하시기 바랍니다 :)
그래서 중앙 집중식 저장소만 있으면 모든 것이 완벽할까 ❓
여러 컴포넌트에서 다양한 방법으로 동시에 Vuex State 접근한다면 서로 충돌이 날 수 있기 때문에
표준화된 방식으로 접근하는 State Management Pattern 제공
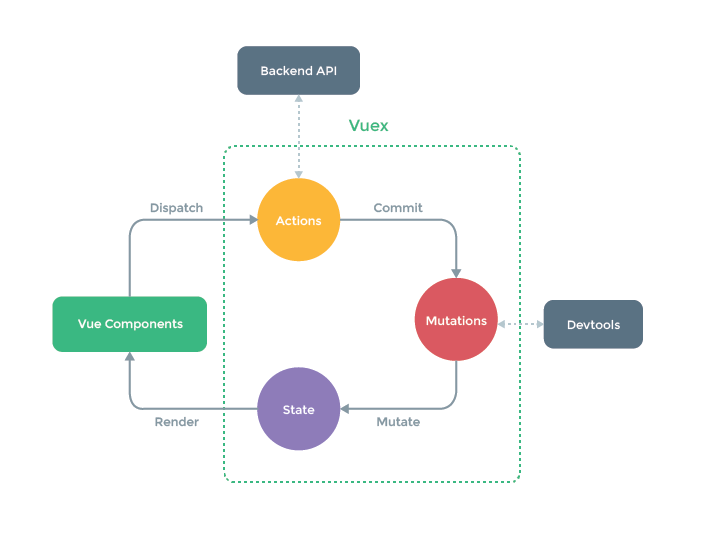
이미지 출처 : Vuex 공식문서
Vuex 의 State Management Pattern 은 Flux, Redux, The Elm Architecture 에서 영감을 받았다고 합니다~
State Management Pattern 좀 더 자세히 알아보기
주요 요소는 4가지
- state : global state 데이터
- mutations : state 의 상태 변경 관리
- actions : (mutation commit을 통한) state 업데이트
- getters : state 를 활용한 계산된 값 제공
WorkFlow
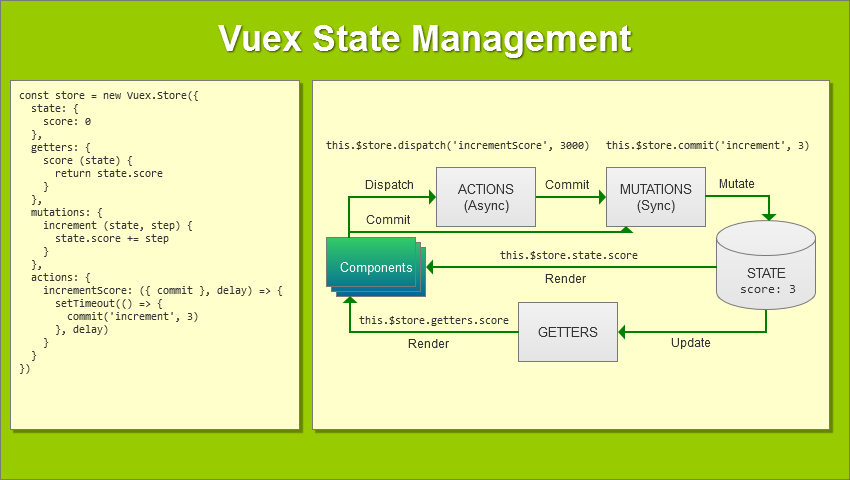
이미지 출처 : How to Build Complex, Large-Scale Vue.js Apps With Vuex
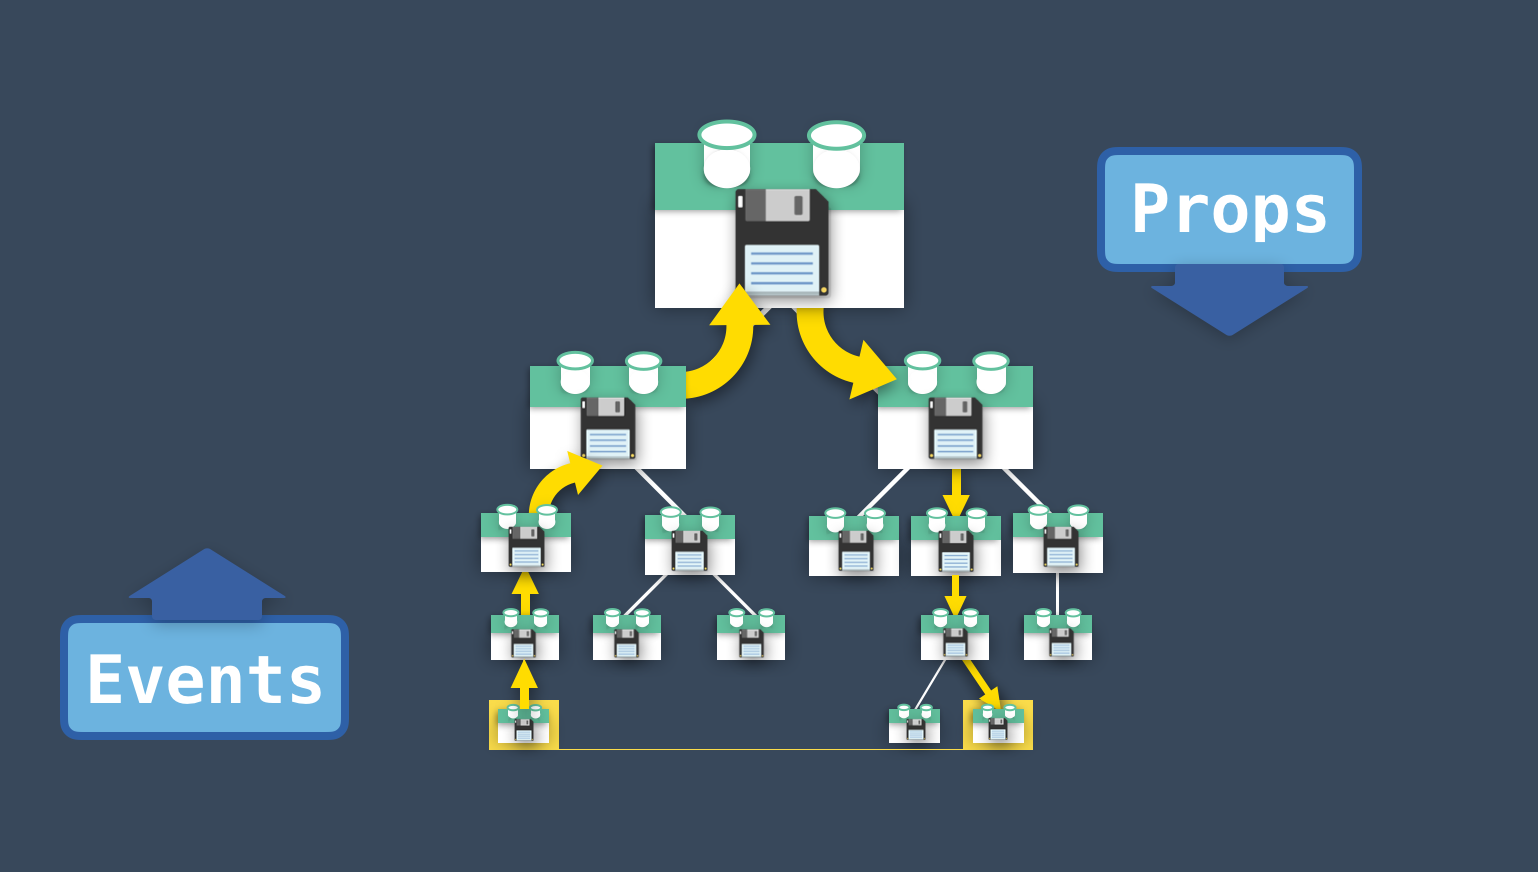
Vue 와 Vuex 의 유사성
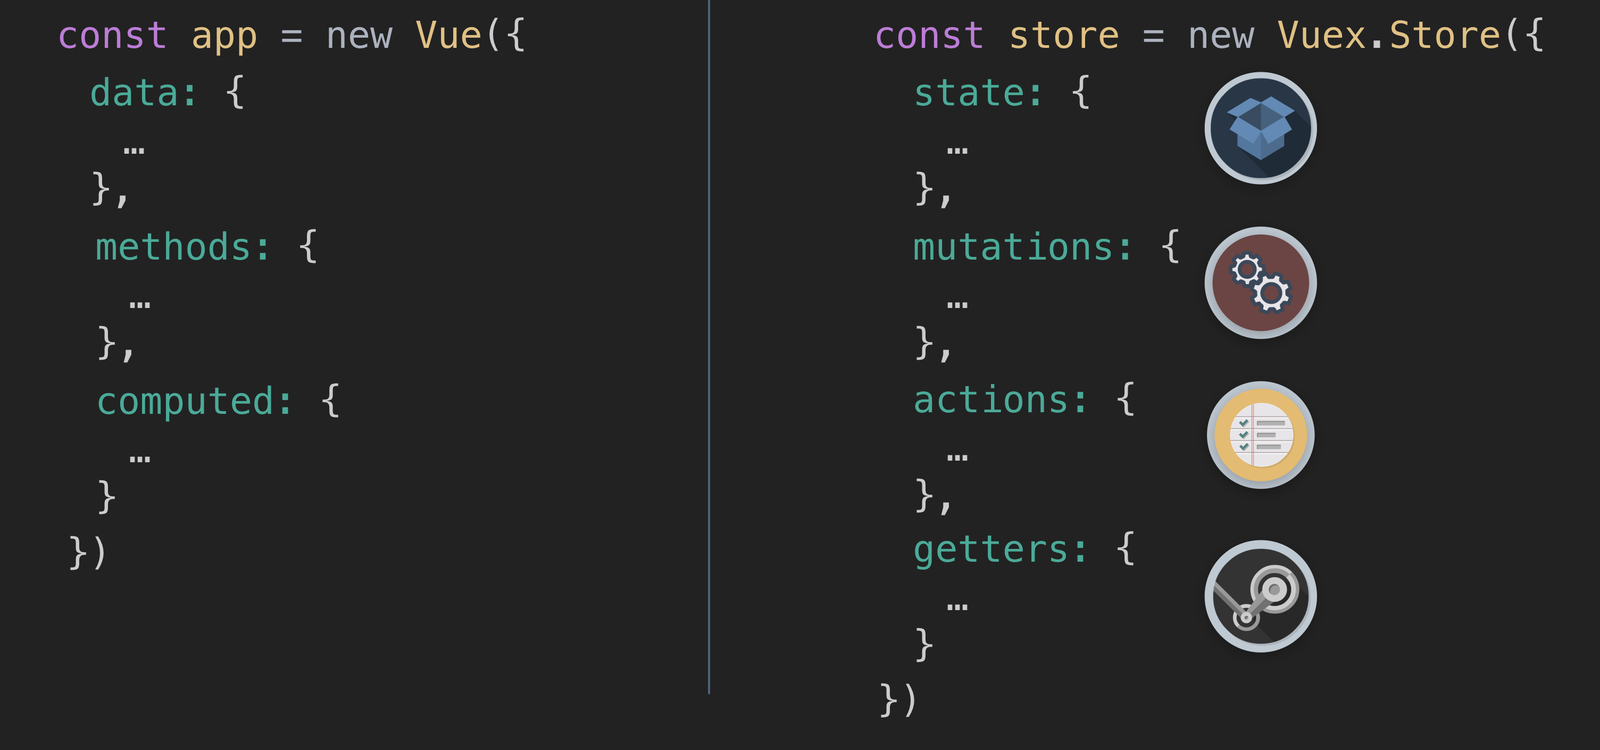
이미지 출처 : Vuex Explained Visually
정리해보자면...
| Vue (컴포넌트, local) | Vuex (전역, global) | 역할 | 차이점 |
|---|---|---|---|
| data | state | 상태 데이터 | |
| mutations | state를 변화시킴 | Vuex에만 존재함 | |
| methods | actions | 함수 | actions는 mutation을 commit 함 |
| computed | getters | 계산된 값 |
Vuex 사용하기
기본 설정
-
store.js파일 생성import Vue from "vue"; import Vuex from "vuex"; Vue.use(Vuex); const store = new Vuex.Store({ state: {}, mutations: {}, actions: {}, getters: {}, }); export default store; -
main.js에서 전역 사용 가능하도록 등록import store from "./store"; new Vue({ router, store, // <-- injecting the store for global access render: (h) => h(App), }).$mount("#app");이 설정은 Vue CLI로 프로젝트 생성 시
Vuex를 선택했다면 잘 설정되어 있습니다 :)
Access State
-
state에 데이터 추가const store = new Vuex.Store({ state: { user: { id: 'wooyoung85', name: 'WooYoung SEO' } }, ... }); -
state에 접근하기<template> <h1>{{ $store.state.user.name }}</h1> </template>
여러 state에 접근하고 싶을때 좀 더 효율적인 방법은 없을까?
-
state에 많은 데이터가 있다고 가정state: { user: { id: 'wooyoung85', name: 'WooYoung SEO' }, cities: ['서울', '대전', '대구', '부산', '광주', '울산'], ... }, -
vue파일 수정<template> <div> <h1>{{ userName }}</h1> <p>{{ cities.length }}</p> </div> </template> <script> import { mapState } from 'vuex' export default { ... computed: mapState({ userName: state => state.user.name, cities: state => state.cities }) } </script>
mapState 를 좀 더 간단하게 작성
-
축약 표현법 (
state => state.cities👉 'cities')computed: mapState({ user: "user", cities: "cities", }); -
배열 안에
state들을 string type 으로 넘겨주기computed: mapState(["cities", "user"]);⚠️ but,computed: mapState()이런 식으로 작성한다면 다른 computed 속성을 추가할 수 없음 !!! -
Spread Operator 활용
mapState에서 반환되는 객체를 펼처서computed요소로 추가computed: { localComputed() { return something }, ...mapState(['cities', 'user']) }
🌈 ES6 문법
구조분해 할당 (Destructuring)
간단한 예제
const destruct = ({ mapState }) => {
  console.log(mapState);
};
const arg = { mapState: "I am mapState" };
destruct(arg);
Module Import 할 때 구조분해 할당 (Destructuring) 을 활용하면 좀 더 깔끔한 코드를 작성할 수 있음
-
실제
vuex.common.js는 대략적으로 이렇게 생겼음/** * vuex v3.1.2 * (c) 2019 Evan You * @license MIT */ 'use strict'; ... var index = { Store: Store, install: install, version: '3.1.2', mapState: mapState, mapMutations: mapMutations, mapGetters: mapGetters, mapActions: mapActions, createNamespacedHelpers: createNamespacedHelpers }; module.exports = index; -
vue파일에서mapState와mapGetters를 사용하기 위해 구조분해 할당을 사용import { mapState, mapGetters } from "vuex";
구조분해 할당 관련하여 자세한 내용은 아래 글을 참고하시기 바랍니다.
ES2015(ES6) 구조 분해 할당(destructuring)
전개 연산자 (Spread Operator)
const odd = [1, 3, 5];
const nums = [2, ...odd, 4, 6]; // [2, 1, 3, 5, 4, 6]
mapState() 에서 return 한 객체를 그대로 computed 에 할당하는 것이 아니라
return 객체를 펼처서 하나씩 computed 에 넣어주면 다른 computed 속성도 작성 가능
Getters
-
getters추가const store = new Vuex.Store({ state: { user: { id: "wooyoung85", name: "WooYoung SEO" }, cities: ["서울", "대전", "대구", "부산", "광주", "울산"], }, mutations: {}, actions: {}, getters: { citiesLength: (state) => { return state.cities.length; }, }, }); -
getters사용하기<template> <p>{{ this.$store.getters.citiesLength }}</p> </template>
mapGetters 도 있음
-
getters가 다수 있다고 가정const store = new Vuex.Store({ state: { user: { id: "wooyoung85", name: "WooYoung SEO" }, cities: ["서울", "대전", "대구", "부산", "광주", "울산"], todos: [ { id: 1, text: "1번 할일", done: true }, { id: 2, text: "2번 할일", done: false }, { id: 3, text: "3번 할일", done: true }, { id: 4, text: "4번 할일", done: false }, ], }, getters: { citiesLength: (state) => { return state.cities.length; }, activeTodosCount: (state) => { return state.todos.filter((todo) => !todo.done).length; }, getEventById: (state) => (id) => { return state.todos.find((todo) => todo.id === id); }, }, });화살표가 두번 나오는
Arrow Function은 위에서 이미 설명했음 :) -
mapState와 유사하게 사용하면 됨<template> <div> <p>{{ citiesLength }}</p> <p>{{ activeTodosCount }}</p> <p>{{ getEventById(1).text }}</p> </div> </template> <script> import { mapGetters } from 'vuex' export default { ... computed: mapGetters([ 'citiesLength', 'activeTodosCount', 'getEventById' ]) } </script> -
당연히 구조분해 할당도 가능
computed: {
  localComputed() {
    return something
  },
  ...mapGetters({
    catCount: 'citiesLength',
    getEvent: 'getEventById'
  })
}
Mutaions
Mutation commit 하기
- cart 라는 state 가 있다고 가정
state: { cart: 0, } - mutation 정의
mutations: { ADD_CART(state) { state.cart += 1 } } - mutation commit
<template>
  <p><span>증가 값 : </span><input type="number" v-model.number="incrementBy" /></p>
  <p>Cart : {{ this.$store.state.cart }}</p>
  <button @click="clickCartButton">ADD CART</button>
</template>
<script>
  ...
  methods: {
    clickCartButton() {
      this.$store.commit('ADD_CART')
    },
  }
</script>
Mutation 에 Payload 전달하기
-
store.js에mutations수정mutations: { ADD_CART(state, value) { state.cart += value } } -
mutation commitdata() { return { incrementBy: 1 } }, methods: { clickCartButton() { this.$store.commit('ADD_CART', this.incrementBy) }, }
Actions
Mutation으로 상태 변경이 가능한데 Actions 는 왜 필요할까?
시간이 꽤 걸리는 API 호출을 통해 화면을 업데이트를 할 경우
mutation 은 synchronous 하게 작업을 처리하기 때문에 마냥 기다려야 함 😫이럴 경우에 Actions 를 사용하면 깔끔하게 작업을 처리할 수 있음
- store.js 에
actions추가actions: { updateCart({ state, commit }, incrementBy) { if (state.inStock) { commit('ADD_CART', incrementBy) } } action dispatch<template> <p><span>증가 값 : </span><input type="number" v-model.number="incrementBy"></p> <p>Cart : {{ this.$store.state.cart }}</p> <button @click="clickCartButton">ADD CART</button> </template> <script> data() { return { incrementBy: 1 } }, methods: { clickCartButton() { this.$store.dispatch('updateCart', this.incrementBy) }, } </script>
Vuex 관련하여 더 많은 내용이 있지만 다 다루지 못하였습니다.
😭
좀 더 심화된 내용은 추후에 업데이트 하도록 하겠습니다.
API 호출 (with. Axios)
Mock API Server
-
db.json파일 만들기 (파일 내용은 github 참고) -
json-serverInstall$> npm install -g json-server $> json-server --watch db.json \{^_^}/ hi! Loading db.json Done Resources http://localhost:3000/cellphones Home http://localhost:3000 Type s + enter at any time to create a snapshot of the database Watching... -
브라우저에서 확인

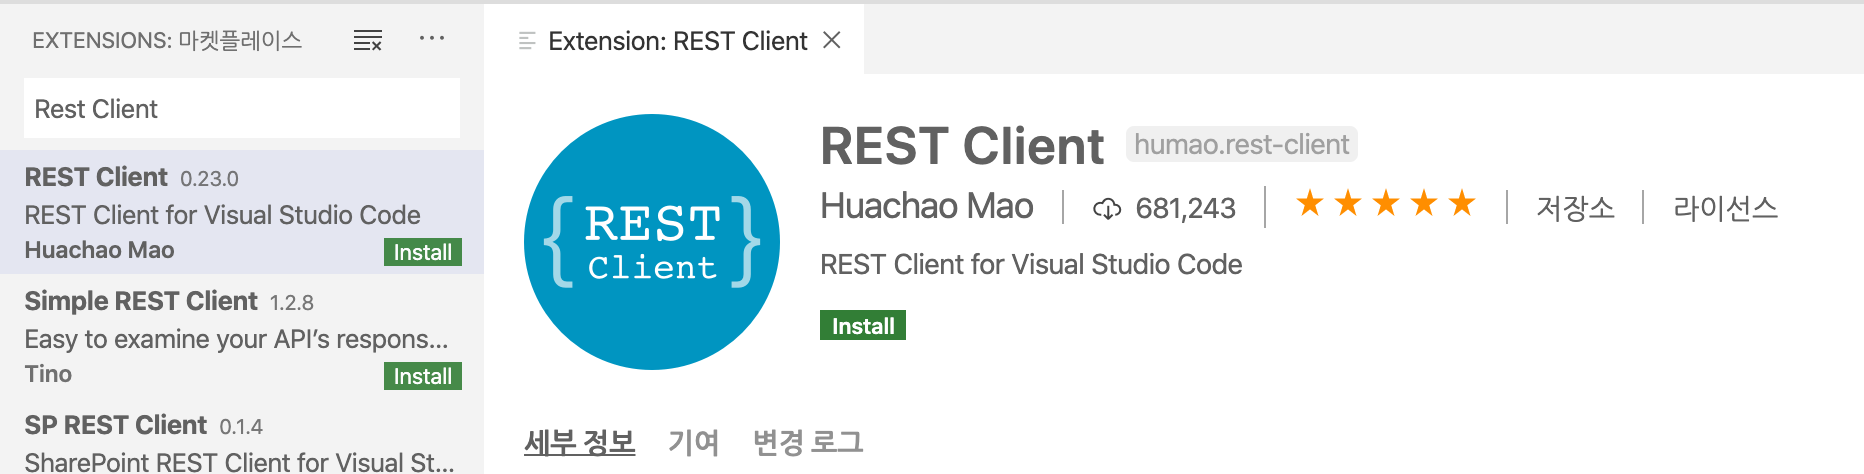
Rest Client Install
API 테스트를 위해 PostMan 같은 Tool을 일반적으로 많이 사용하지만
Visual Studio Code Extention 중 매우 괜찮은 Tool이 있어서 사용해 보려고 합니다 ^^
Extension Install
사용하기
-
테스트 작성
POST http://localhost:8080/register Content-Type: application/json { "username": "test", "password": "password" } -
Send Request
-
Install Axios
$> npm install axios
Axios 사용하기
Axios 란?
👉 Promise based HTTP client for the browser and node.js
📱 ProductList Component에 뿌릴 데이터를 원격 API 에서 받아오는 예제
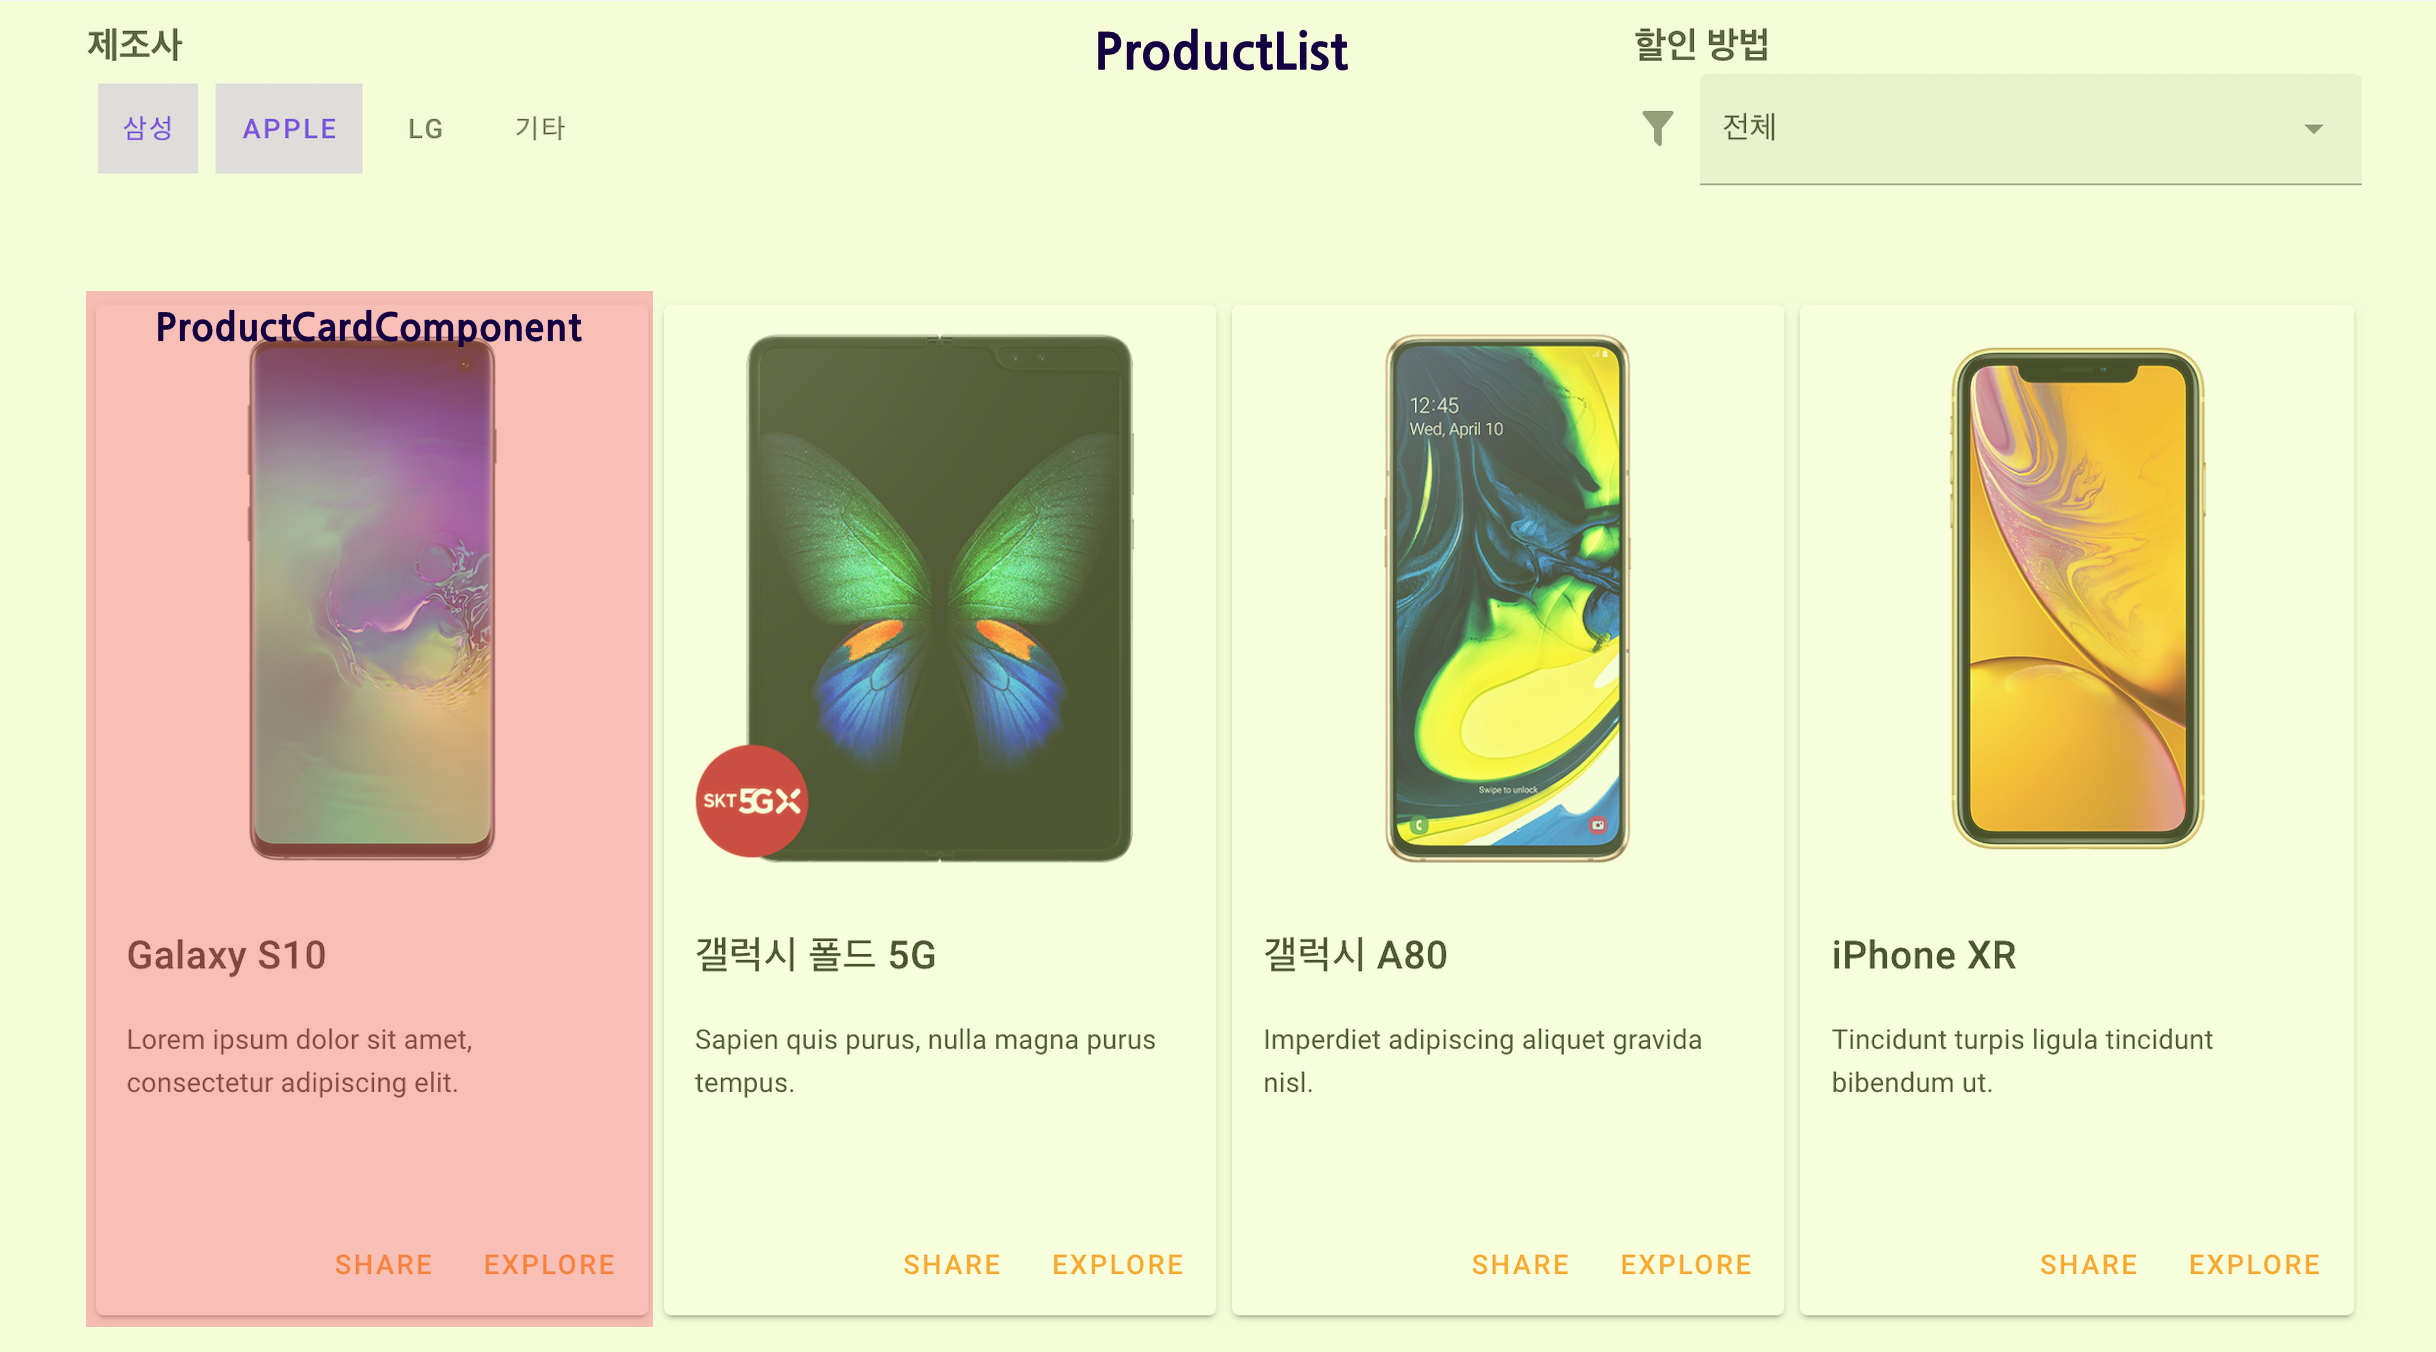
Component에서 axios 직접 사용하기
-
ProductList수정<template> ... <product-card-component v-for="(product, index) in products" :key="index" :product="product" /> </template> ... <script> import ProductCardComponent from "../components/ProductCardComponent"; import axios from "axios"; export default { components: { ProductCardComponent }, data() { return { products: [], } } created() { axios .get("http://localhost:3000/cellphones") .then(response => { this.products = response.data; }) .catch(error => { console.log("Error Message :", error.response); }); } } </script>
Service로 분리하기
-
src/services/ProductService.js만들기import axios from "axios"; const apiClient = axios.create({ baseURL: `http://localhost:3000`, withCredentials: false, headers: { Accept: "application/json", "Content-Type": "application/json", }, }); export default { getCellphones() { return apiClient.get("/cellphones"); }, }; -
ProductList수정<script> import ProductCardComponent from "../components/ProductCardComponent"; import ProductService from '@/services/ProductService.js' export default { ... created() { ProductService.getCellphones() .then(response => { this.products = response.data; }) .catch(error => { console.log("Error Message:", error.response) }) } } </script>
참고자료
Vue Router 공식문서
Our Courses | Vue Mastery
[Vue.js] Lazy load 적용하기2
Vuex 공식문서
Vuex Explained Visually